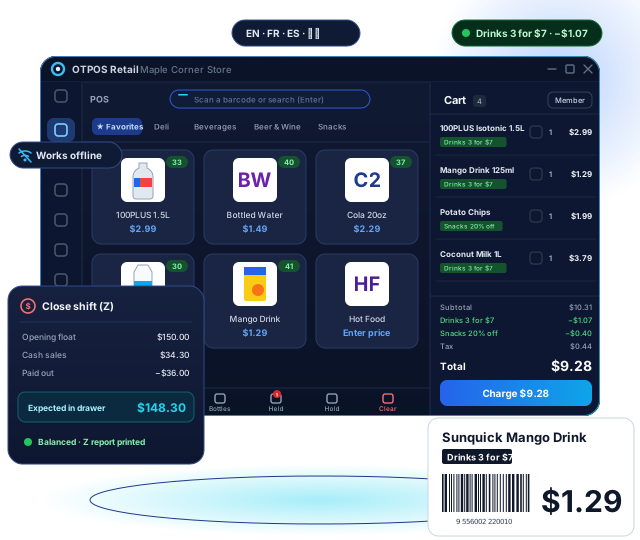
OTPOS Retail is point-of-sale (cash register) software for small shops: convenience stores, grocery stores, cafés and bakeries. It works completely offline, runs on a normal Windows PC or an all-in-one touch-screen register, and works with a USB barcode scanner, a thermal receipt printer (58 mm or 80 mm) and a cash drawer.
The examples follow a new store from its very first start: Maple Corner Store in Calgary (GST 5 % added at checkout, cash rounded to $0.05). The Dashboard and Reports screenshots come from a busier shop, High Street Corner Shop, a UK convenience store with prices including VAT and a month of trading.
Quick start: a day at the till
The ten things a cashier does every day, with links to the details:
| # | When | What to do |
|---|---|---|
| 1 | Opening | Sign in, or unlock with your PIN. Section 4 |
| 2 | Opening | Open the POS screen and enter the opening float — the cash you put in the drawer. Section 9 |
| 3 | Each sale | Scan the items or tap the tiles. 3* + scan adds three. Section 7 |
| 4 | Each sale | Alcohol or tobacco: check the customer’s ID when asked. Adding items |
| 5 | Each sale | Tap Charge (F12), choose Cash or Card, tap Complete payment, give the change. Section 8 |
| 6 | As needed | Customer forgot something? Hold (F8) the sale, serve the next customer, then Held → Restore. Hold and recall |
| 7 | As needed | Paying a supplier from the till: Drawer (F9) → Pay out, with a reason. Section 9 |
| 8 | As needed | Stepping away: press Ctrl+L to lock. Lock screen |
| 9 | Closing | Drawer → Close shift (Z): count the cash, enter the total, print the Z report. Closing the shift |
| 10 | Closing | Managers: check Reports → Shifts for over/short, and back up to a USB stick regularly. Backup |
1. Before you start
Computer
- Windows 7 SP1 or later (Windows 10 / 11 recommended). Installers are available for 64-bit and 32-bit Windows.
- Microsoft .NET Framework 4.6.2 or later. Windows 10 and 11 already include it; the installer checks for it and tells you where to download it if it is missing.
- A screen of at least 1024 × 640. 1366 × 768 or larger is recommended for touch-screen registers.
Devices (optional)
| Device | How to connect |
|---|---|
| Barcode scanner | Any USB scanner in keyboard mode. No setup needed. |
| Receipt printer | ESC/POS thermal printer, 58 mm or 80 mm, on USB (installed in Windows) or on the network. Any other Windows printer also works for receipts. |
| Cash drawer | Plugged into the receipt printer (RJ11). It opens automatically for cash payments. |
| Label printer | Any label printer with a Windows driver (Zebra, DYMO, Brother, TSC …), or sheets of A4 / Letter labels. |
| Scale | Not connected directly. Enter the weight shown on the scale, or scan the price/weight labels your scale prints. |
User roles
| Role | Can do |
|---|---|
| Cashier | Sell, take payment, hold orders, members, look up transactions, reprint receipts, open/close shifts, pay in/out (blind count — cannot see the expected cash). |
| Manager | Everything a cashier can do, plus refunds, price changes, products, inventory, promotions and reports. |
| Admin | Everything, plus settings, staff accounts and backup/restore. |
2. Installing
- Download the installer for your Windows version (64-bit or 32-bit) from the OTPOS Retail download section and run it.
- The installer checks the computer first:
- If .NET Framework 4.6.2 or later is missing, it tells you so and offers to open the Microsoft download page for the .NET Framework 4.8 Runtime. Install it, restart if Windows asks, and run the installer again.
- If the screen is smaller than 1024 × 640 it warns you; you can continue anyway.
- If OTPOS Retail is already running, close it first.
- Accept the license agreement, choose the folder and whether you want a desktop icon, and click Install.
Your data (database, backups, product images and logs) is stored in %LocalAppData%\OTPOS Retail. Uninstalling the program does not delete it.
Upgrading (free)
New versions of OTPOS Retail are free upgrades. Download the new installer and run it over the installed version: products, sales, staff and settings are kept, and the database is updated automatically the first time the new version starts. The program makes its daily backup before that, so you can go back if needed (restore the backup together with the old version).
3. First-time setup
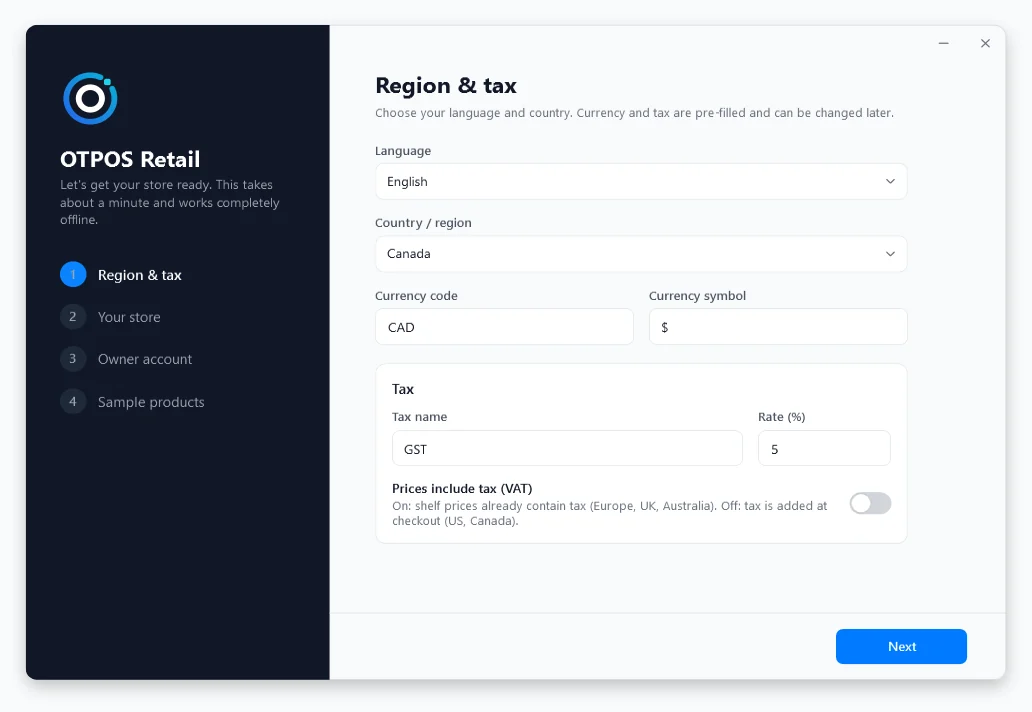
The first time OTPOS Retail starts, a four-step wizard sets up your store. The interface language is chosen automatically from Windows (English, French, Spanish or Chinese; English if none matches) and the country from your Windows region. You can change both on the first page.
Step 1 — Region & tax
 Full screen
- Language — the language of the program.
- Country / region — fills in the currency, tax name, tax rate and whether shelf prices include tax. Canada sets CAD $, GST 5 % added at checkout and cash rounding to 0.05; the United Kingdom sets VAT 20 % with prices including tax; the United States sets Sales Tax, where you enter your rate.
- Tax rate — US stores enter their state/local sales tax rate (for example 8.875).
- Prices include tax (VAT) — on in Europe, the UK, Australia and similar countries; off in the US and Canada, where tax is added at the till.
Everything here can be changed later in Settings → Store / Tax.
 Full screen
 Full screen
 Full screen
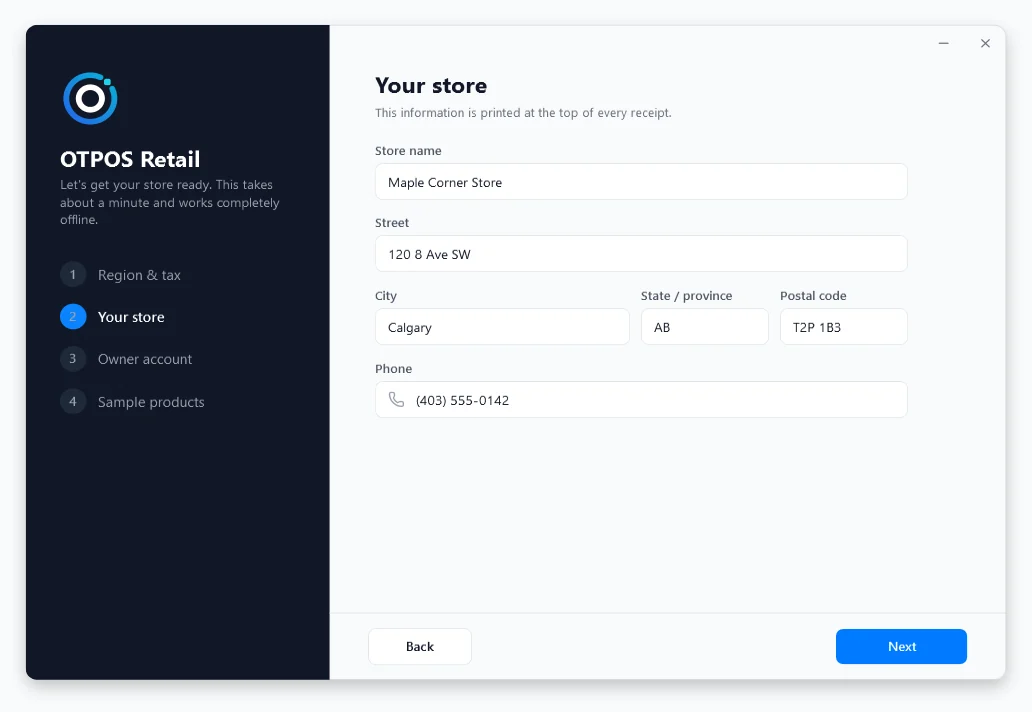
Step 2 — Your store
The store name (required), address and phone number. They are printed at the top of every receipt.
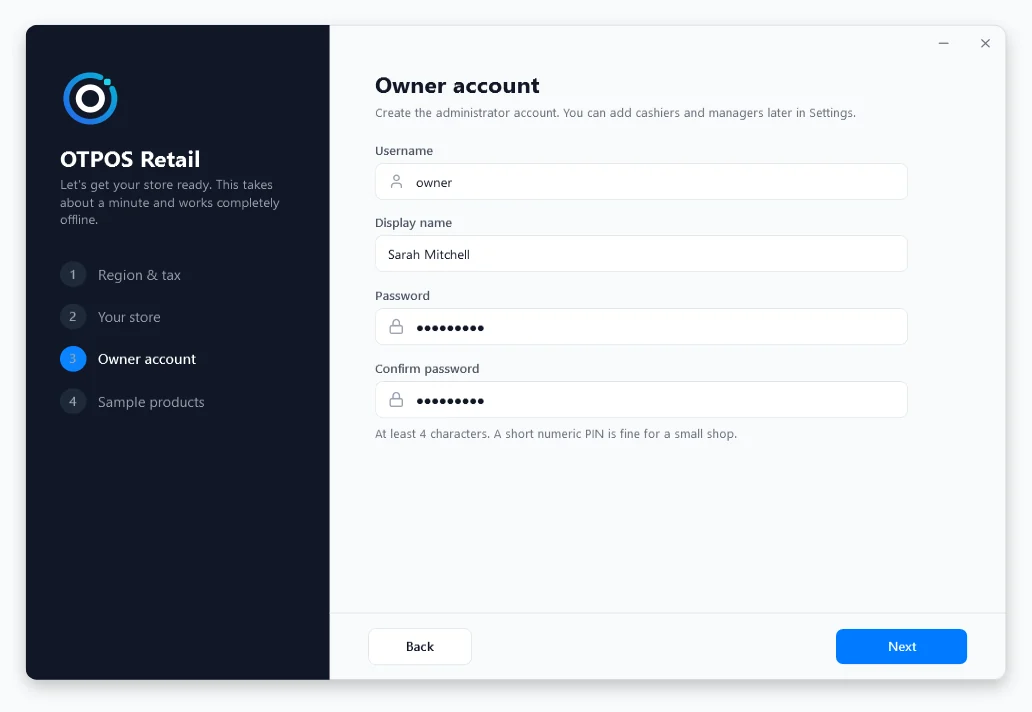
Step 3 — Owner account
Create the administrator account: user name, display name and password (at least 4 characters). You can add cashiers and managers later in Settings → Staff accounts.
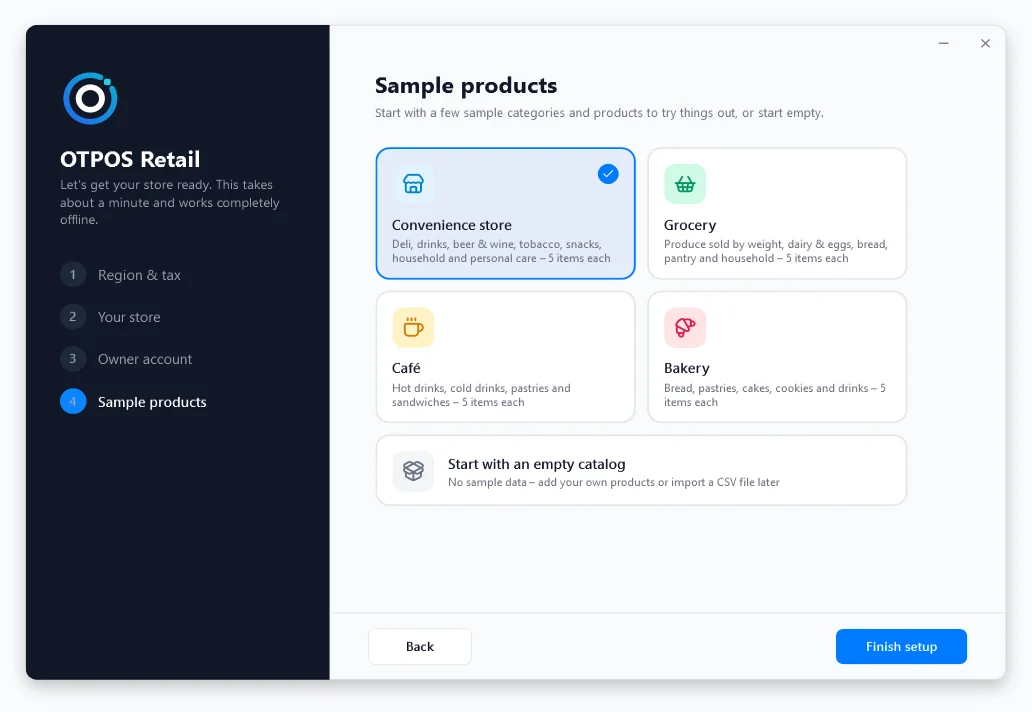
Step 4 — Sample products
Pick the kind of store to get a ready-made set of categories with 5 sample products each — the quickest way to try the program. You can edit or delete the samples later.
| Store type | Categories |
|---|---|
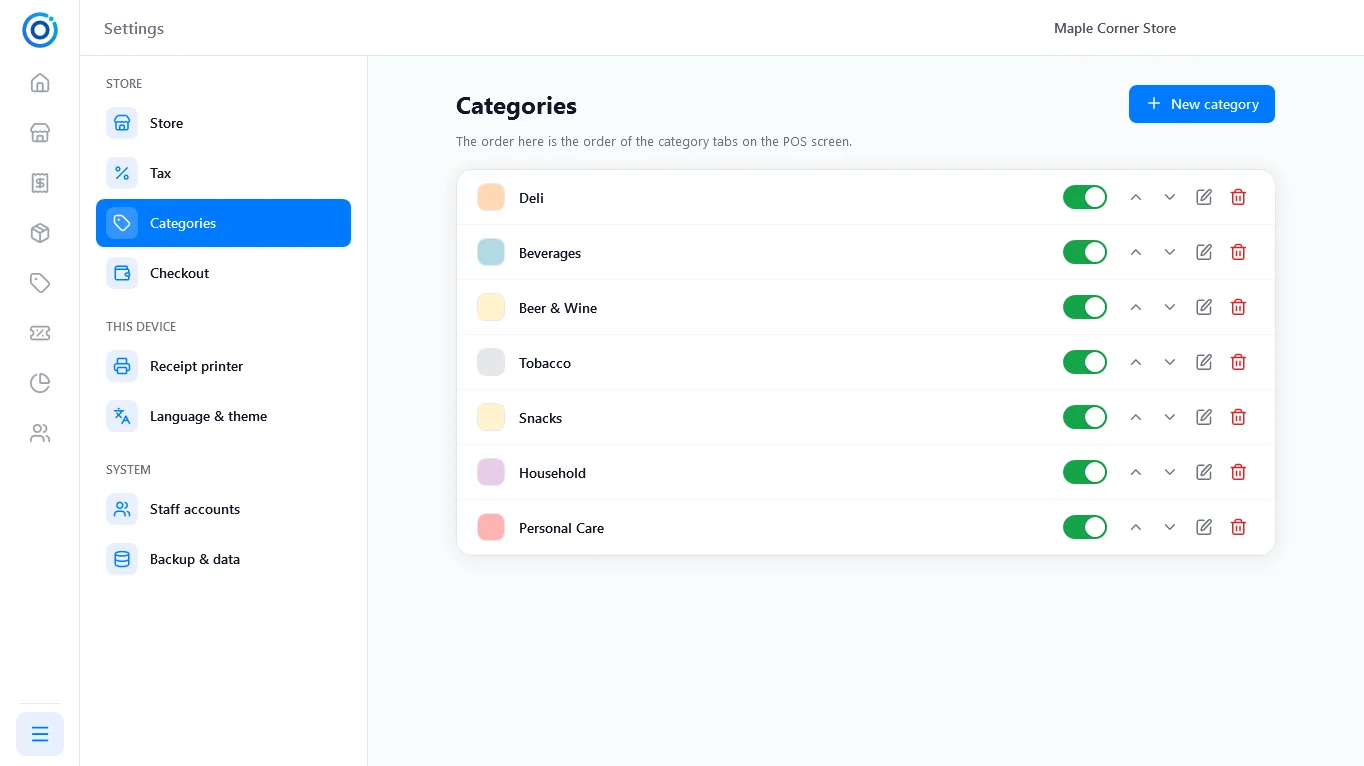
| Convenience store | Deli, Beverages, Beer & Wine, Tobacco, Snacks, Household, Personal Care |
| Grocery | Produce (sold by weight), Dairy & Eggs, Bakery, Pantry, Household |
| Café | Hot Drinks, Cold Drinks, Pastries, Sandwiches |
| Bakery | Bread, Pastries, Cakes, Cookies, Drinks |
Choose Start with an empty catalog to add your own products or import them from a CSV file. Click Finish setup; the sign-in window opens.
4. Signing in, locking and signing out
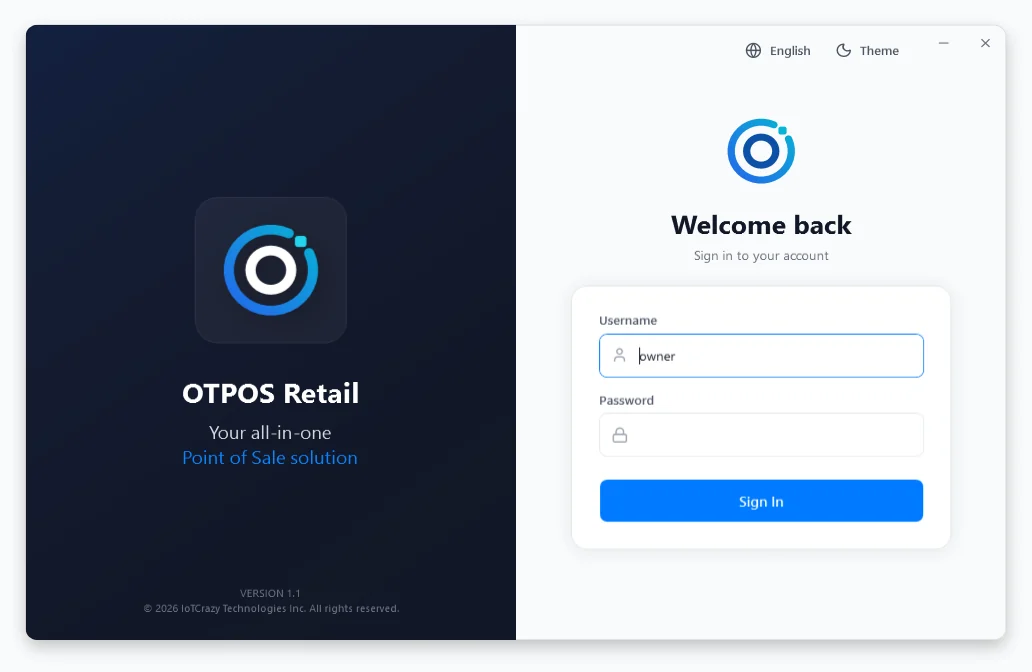
Sign in
 Full screen
Enter your user name and password and press Sign In (or Enter). The English and Theme buttons at the top switch the language and the light/dark theme. Cashiers go straight to the POS screen; managers and admins start on the Dashboard.
Lock screen and switching cashiers
 Full screen
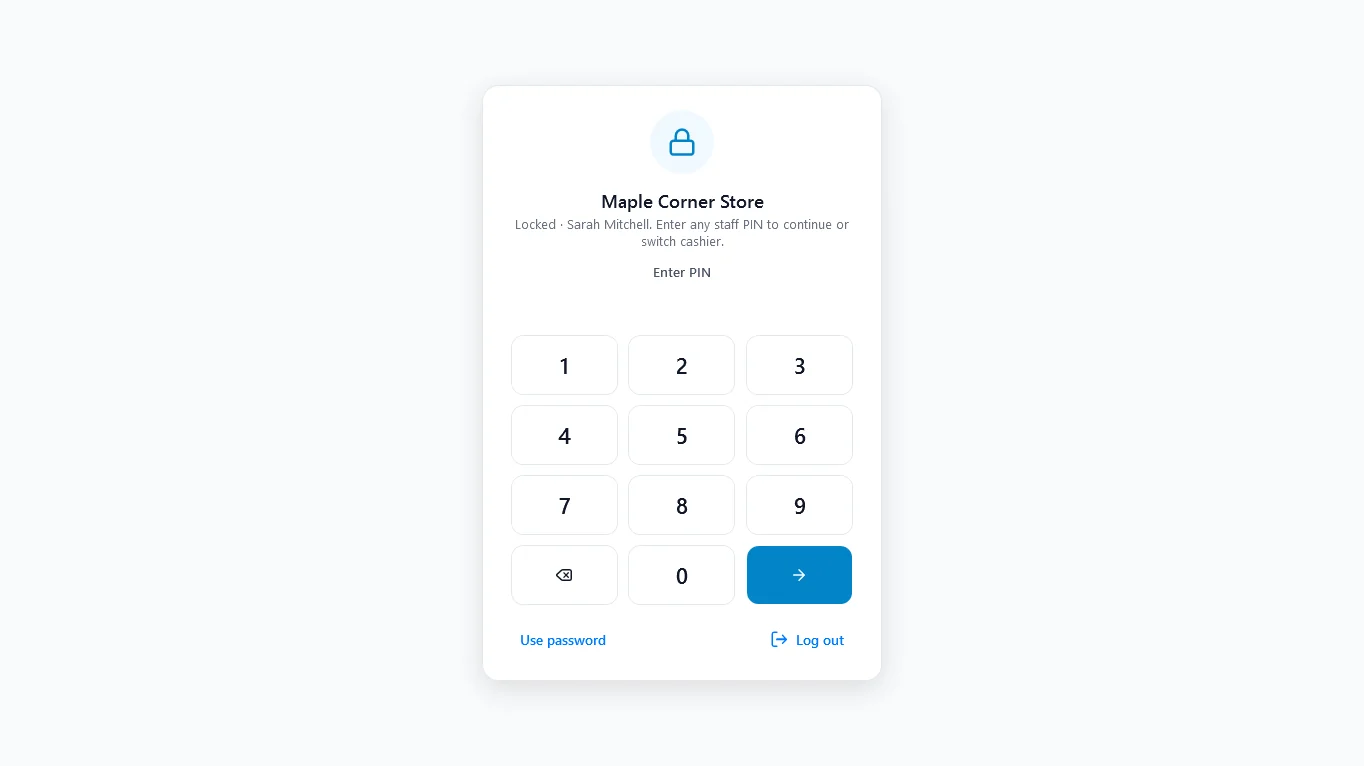
- Lock the register with Ctrl+L or the menu button (☰) → Lock screen. The register also locks itself after a period of inactivity (10 minutes by default).
- The cart, held orders and a payment in progress are kept while locked.
- To unlock, type any staff member’s PIN. If it is a different person, the register switches to them: the next sales are recorded under their name and the menu adapts to their role.
- Staff without a PIN tap Use password. Log out returns to the sign-in window; anything in the cart is held automatically.
PINs (4–6 digits) are set in Settings → Staff accounts.
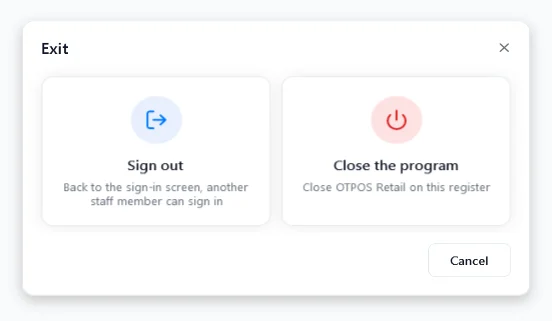
Signing out and closing
 Enlarge
The close button (✕) at the top right, or Alt+F4, asks whether to Sign out or Close the program. If the cart is not empty, you are asked to hold it first.
5. The main window
- Left bar — the pages: Dashboard, POS, Transactions, Inventory, Products, Promotions, Reports, Members. Pages you are not allowed to use are hidden. Hover over an icon to see its name.
- Menu button (☰) at the bottom — Settings (admins), Lock screen, Dark / Light mode.
- Top bar — page title, search / scan box, store name and the page’s own buttons (for example New product, Export).
- Full screen — the full-screen button at the top right, or F11, covers the Windows taskbar. Recommended on dedicated registers; the setting is remembered.
Every list and page can be scrolled with a finger on touch screens.
6. Dashboard
 Full screen
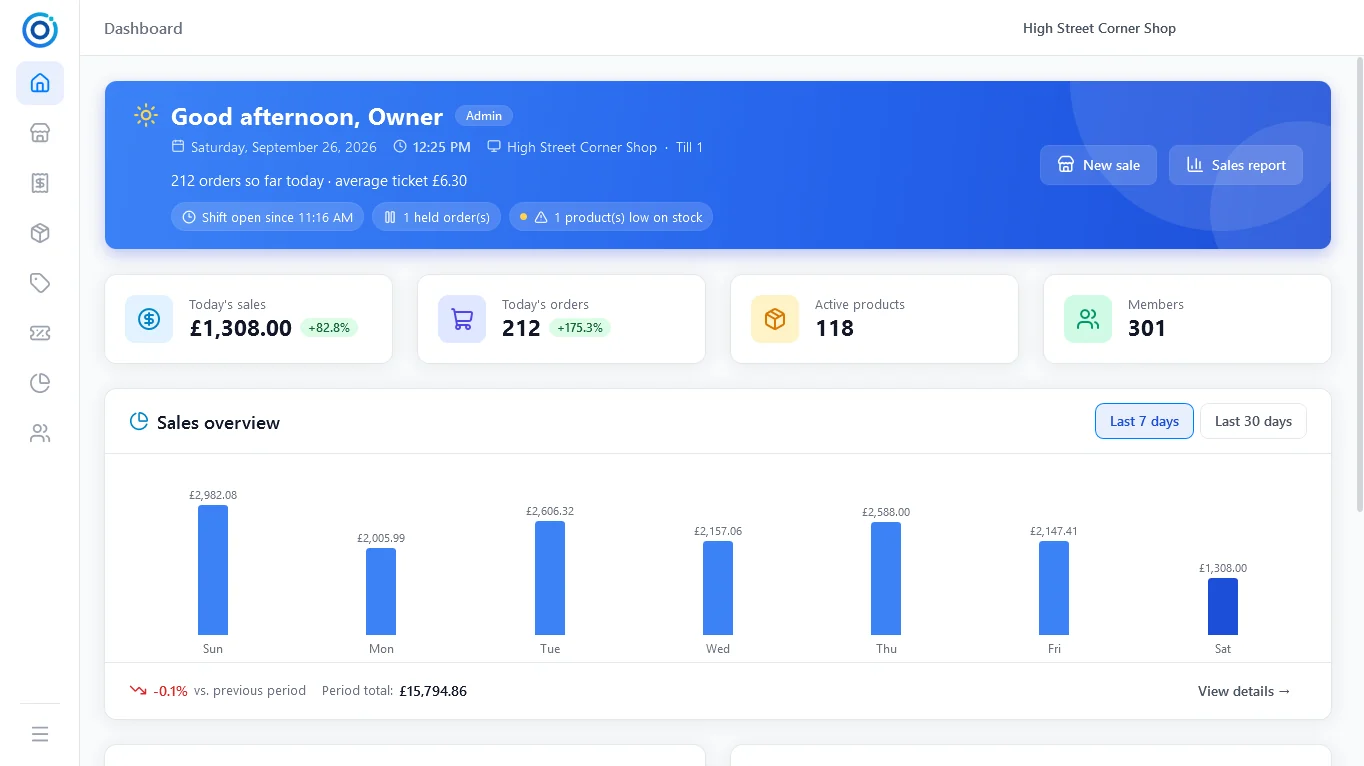
- Greeting banner — date and time, today’s orders and average sale, and status chips: whether this register has an open shift, held orders, and products low on stock. New sale opens the POS screen; Sales report opens Reports.
- Today’s sales / orders — compared with yesterday up to the same time of day, so a morning is not compared with a whole day.
- Sales overview — the last 7 or 30 days; today’s bar is darker. The growth figure compares with the previous period of the same length.
- Recent transactions (double-click to open) and Low stock (products at or below the low-stock threshold).
7. Selling (POS)
 Full screen
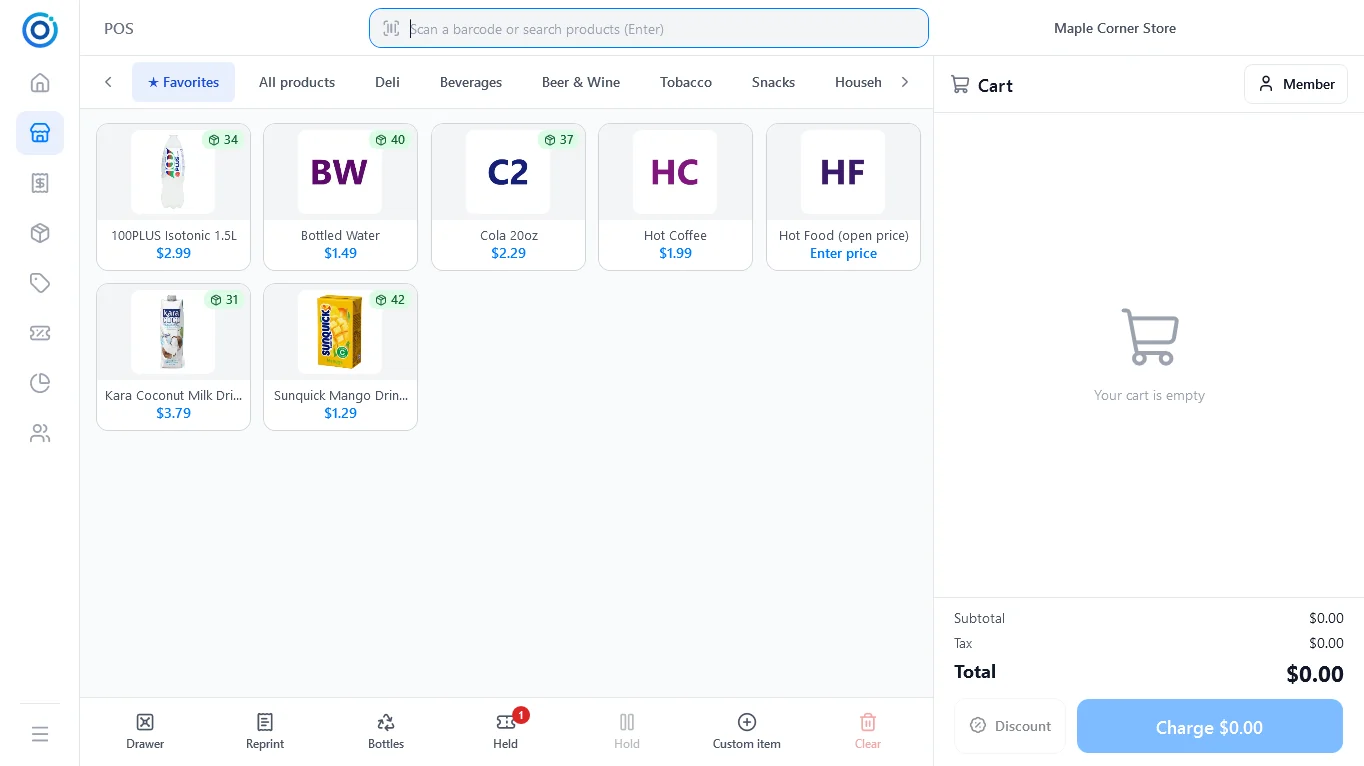
The POS screen has three parts:
- Category tabs across the top. ★ Favorites holds your quick keys (products marked Favorite). Swipe or use the arrows to see more categories.
- Product tiles — tap to add to the cart. The badge shows the stock still available (after what is already in the cart): green = in stock, amber = low, red = out of stock (the tile is greyed out). Products that do not track stock have no badge.
- Function keys along the bottom: Drawer, Reprint, Bottles, Held, Hold, Custom item, Clear.
Adding items
 Full screen
- Scan a barcode at any time — you do not need to click the search box first.
- Search: type part of a name, code or barcode and press Enter. One match is added; several matches filter the tiles.
- Quantity: type
3*and then scan (or type a code) to add 3 at once. Decimals are allowed for weighed items (0.5*). - Open-price items (price 0, shown as Enter price): a number pad asks for the price. It also works with the keyboard: digits, decimal point, Backspace, Enter and Esc.
- Sold by weight: enter the weight shown on the scale. Price-embedded or weight-embedded scale labels are recognised automatically when scanned.
- Age-restricted items (alcohol, tobacco): you are asked to check the customer’s ID and shown the latest date of birth that is allowed. Once confirmed, the same sale does not ask again.
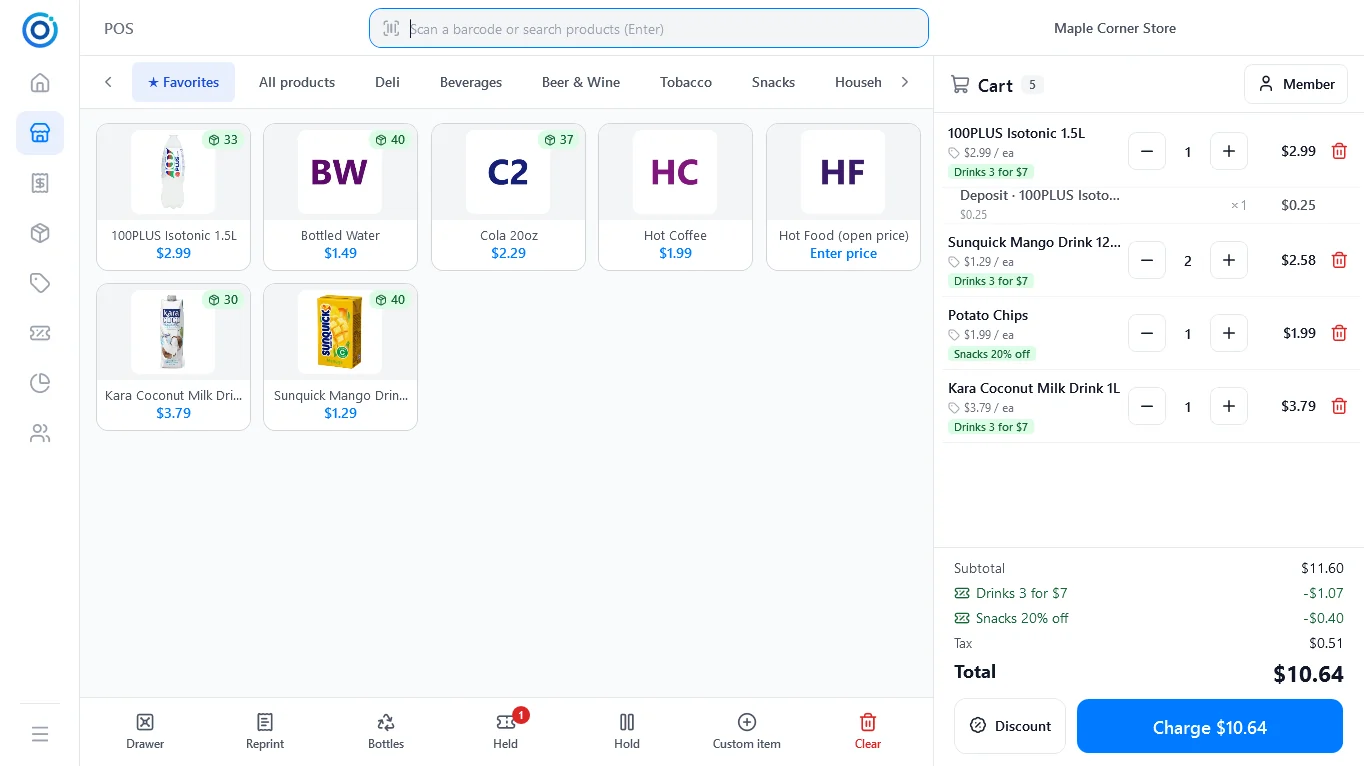
- Bottle deposits: products with a deposit add a deposit line automatically (for example Deposit · Cola 500ml).
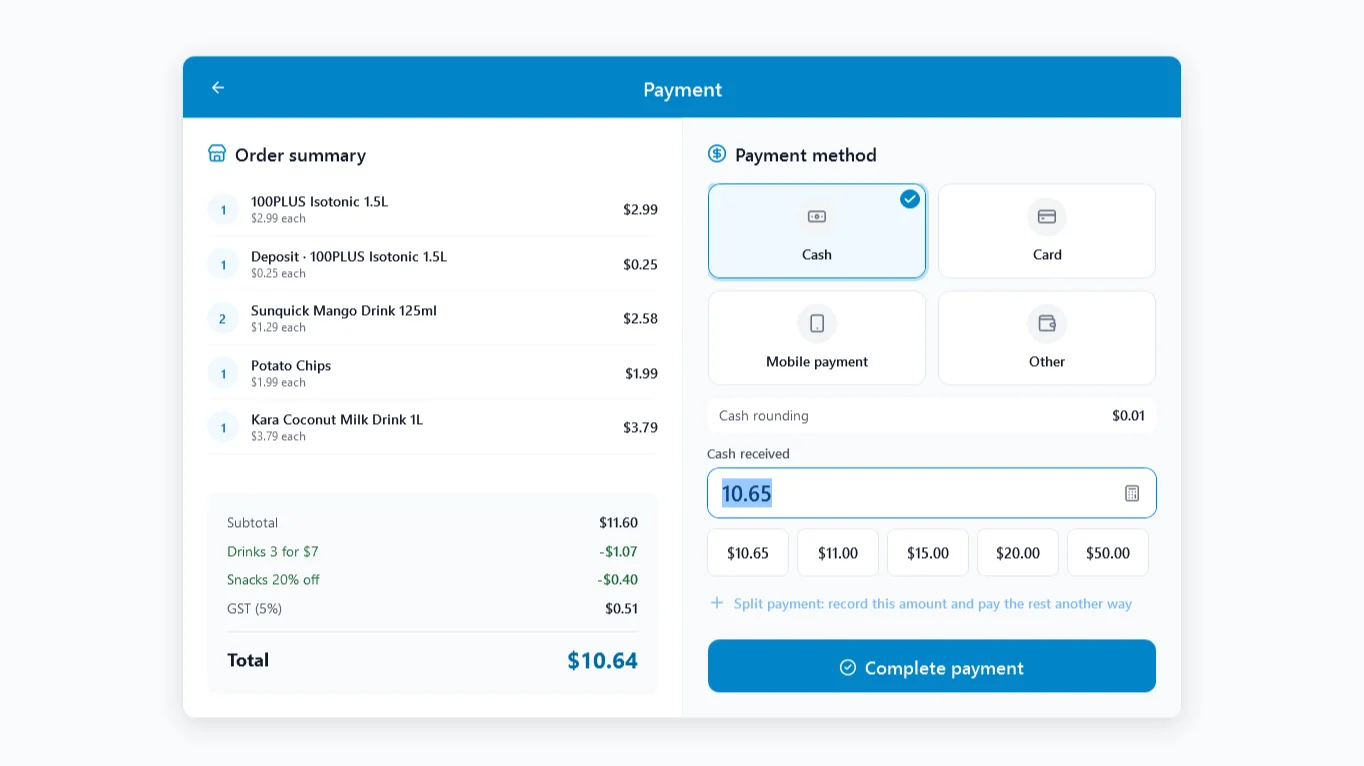
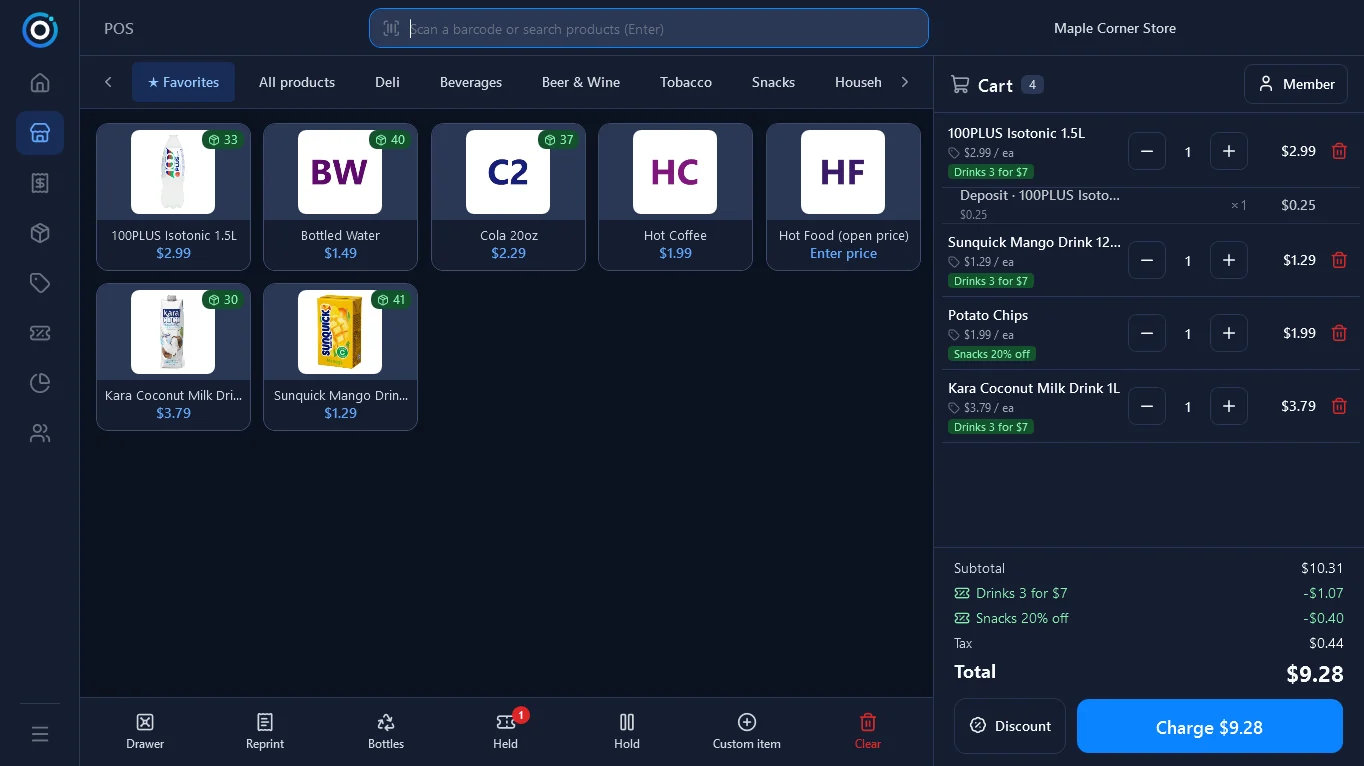
In the example, a 100PLUS (with its 25¢ deposit), two Sunquick mango drinks, crisps and a coconut milk drink qualify for Drinks 3 for $7 (−$1.07) and Snacks 20% off (−$0.40). GST 5 % ($0.51) is added on top, so the total is $10.64.
Changing the cart
- − / + change the quantity; tap the quantity to type it. The trash can removes a line.
- Change price — tap the unit price under the product name. Managers can always do this; cashiers only if allowed in Settings → Checkout. The original price is shown crossed out.
- Promotions are applied automatically; their names appear under the lines and in the totals.
Removing lines, lowering quantities or prices and clearing the cart are recorded in the Voids report for loss prevention.
 Enlarge
 Enlarge
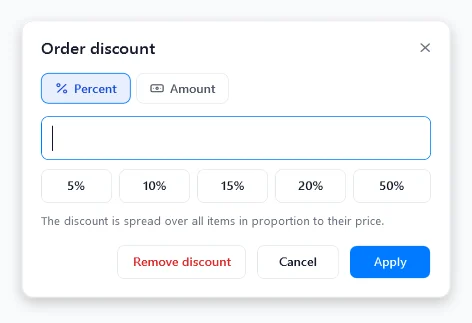
Discount
Discount (next to the charge button) gives a percentage (5/10/15/20/50 % buttons or any value) or a fixed amount off the whole order. It is spread over the items in proportion to their price. Bottle deposits are never discounted.
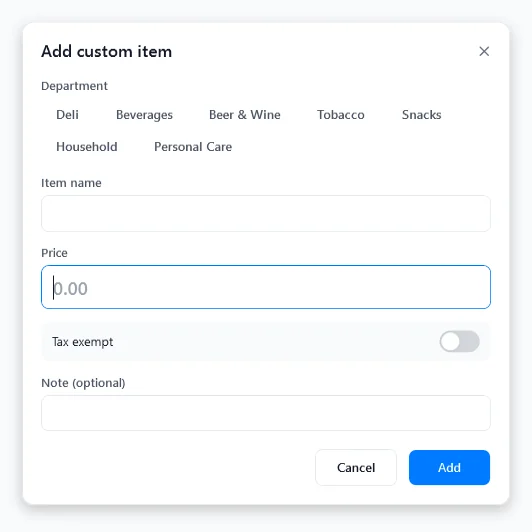
Custom item
For something that is not in the product list: enter a name, the category (for reports) and the price, and optionally mark it tax exempt. Custom items do not change stock.
 Enlarge
 Enlarge
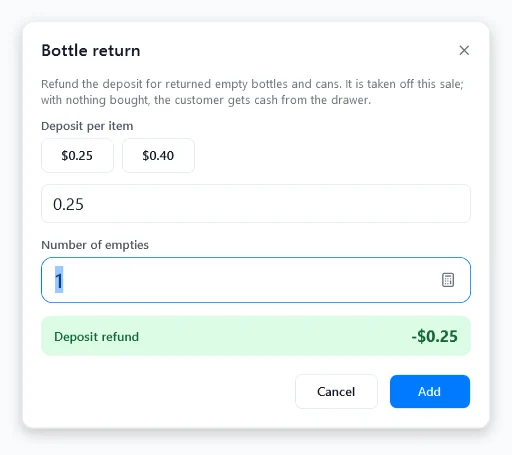
Bottle returns
Bottles adds a negative deposit line for empties the customer brings back: choose the deposit value and the number of bottles. If the customer only returns bottles, the total is negative and the POS pays out cash.
Hold and recall
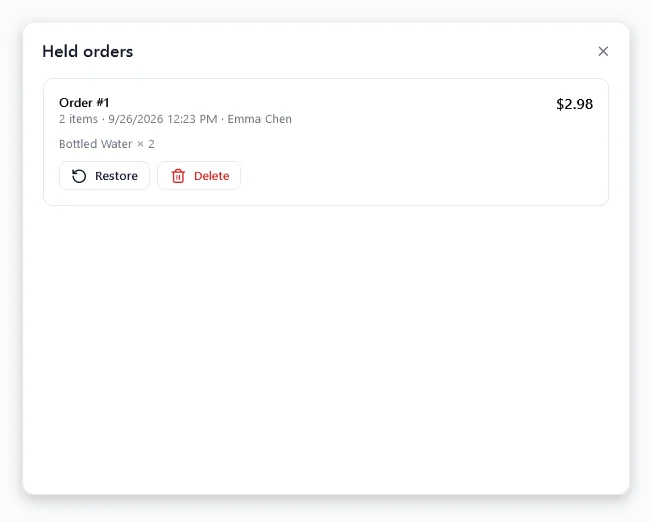
- Hold (F8) parks the current sale so you can serve the next customer. Held orders are saved in the database and survive a restart.
- Held shows the parked sales; the red badge shows how many there are. Restore brings a sale back (the current cart, if any, is held in its place). Delete removes it (recorded as a void).
Member
 Enlarge
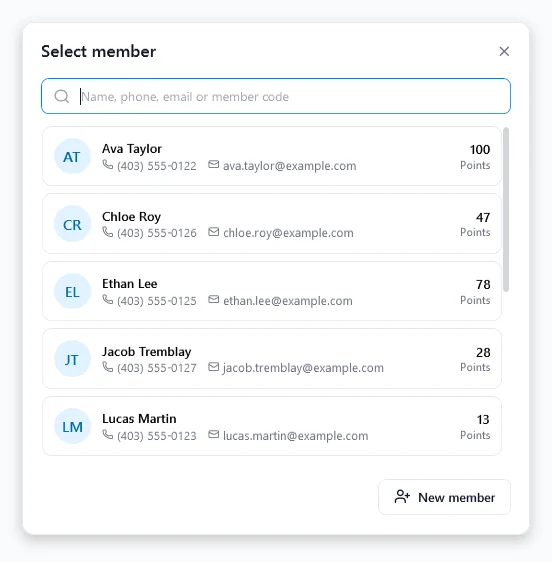
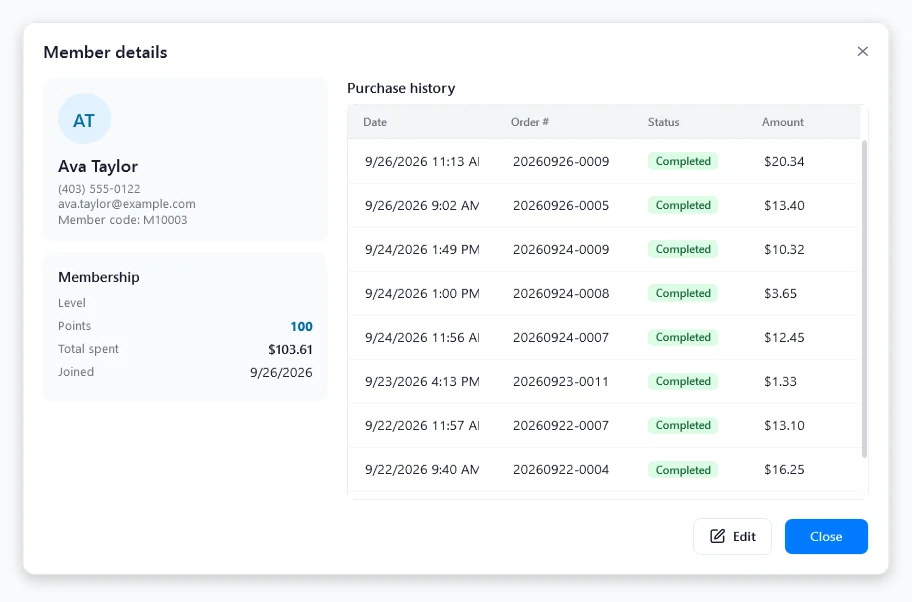
Member (top of the cart) attaches a loyalty member to the sale — search by name, phone, email or member code, or create a new member on the spot. Members earn points on every purchase.
Reprint
Reprint prints the last sale or refund of this register again, marked COPY.
8. Taking payment
Tap Charge (or press F12). If cash-drawer management is on and this register has no open shift, you are asked for the opening float first (see section 9).
 Full screen
The left side shows the order: items, promotions, discount, tax per rate and the total. On the right:
- Choose the payment method: Cash, Card, Mobile payment, Other, or a custom method (gift card, voucher …) set up in Settings.
- Cash: enter the amount received or tap a quick-amount button (exact amount and the next round notes). The change is shown in green.
- Card / other: the amount cannot be more than what is due. You can enter a reference or authorisation code.
- Split payment: enter part of the amount and tap Split payment to record it, then pay the rest another way.
- Tap Complete payment.
The receipt prints automatically (if a printer is set up) and the cash drawer opens for cash payments. With no change due, the screen returns to the POS after 5 seconds; when there is change, the amount stays on screen in large type until you tap New sale.
Cash rounding. In countries without small coins (for example Canada, Switzerland, Australia) the cash part of a payment is rounded to the smallest coin; the card part is charged to the cent. In the example the total $10.64 becomes $10.65 in cash.
Card and mobile payments are taken on your separate card terminal. OTPOS Retail records the method and reference; it does not connect to the payment terminal.
9. Shifts and the cash drawer
With cash drawer management turned on (Settings → Checkout, on by default), every cash sale belongs to a shift of this register, so the drawer can be reconciled.
Open a shift. The first time you open the POS screen, or before the first payment, you are asked for the opening float — the cash in the drawer at the start. It defaults to the float of the previous shift.
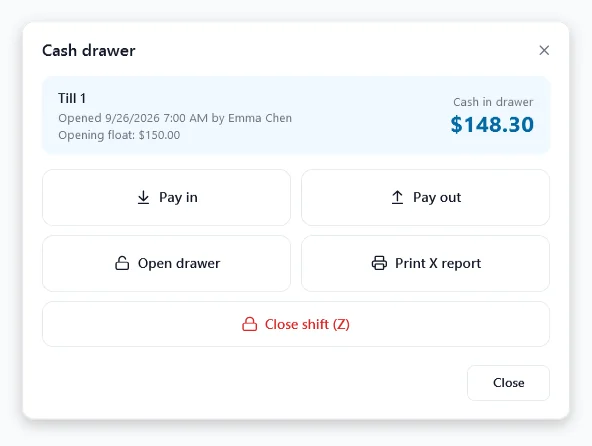
The Drawer function key or F9 opens the cash drawer menu:
- Pay in — add cash (for example extra change).
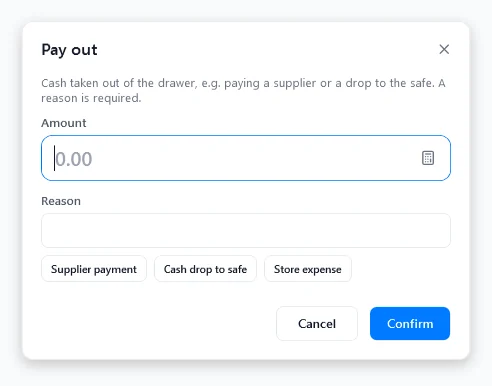
- Pay out — take cash out; a reason is required (supplier payment, cash drop to the safe, store expense …).
- Open drawer — open the drawer without a sale (counted as no sale on the Z report).
- Print X report — the shift so far, without closing it. For cashiers the X report leaves out the cash totals and expected cash (blind count).
- Close shift (Z) — count the drawer and close the shift.
Closing the shift
 Enlarge
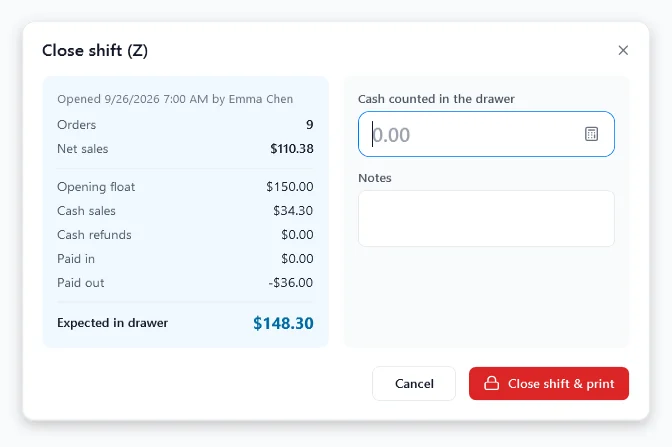
Count all the cash in the drawer (including the float) and enter the total. Managers see the expected amount and whether the drawer is over or short as they type; cashiers do not (blind count). Close shift & print closes the shift and prints the Z report: sales, refunds, taxes, payment methods, cashiers, voids, pay-ins/outs and the over/short amount.
Expected cash = opening float + cash sales − cash refunds + pay-ins − pay-outs. In the example, Emma’s shift started with a $150.00 float, took $34.30 in cash and paid a supplier $36.00, so $148.30 should be in the drawer.
10. Transactions and refunds
 Full screen
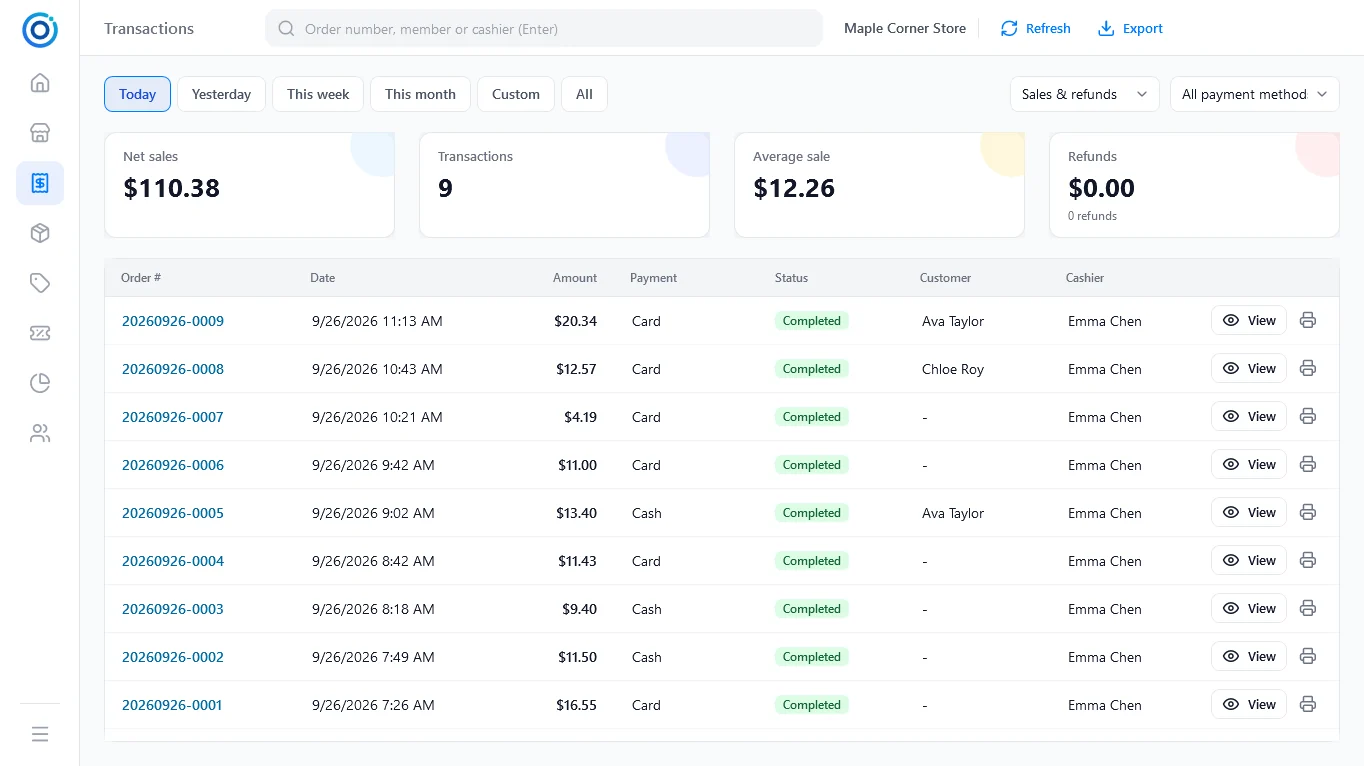
- Choose the period (Today, Yesterday, This week, This month, Custom, All), the type (sales and/or refunds) and the payment method, or search by order number, member or cashier.
- The cards at the top (net sales, number of transactions, average sale, refunds) always cover all matching transactions. The list shows the newest 1,000; Export writes all of them to CSV.
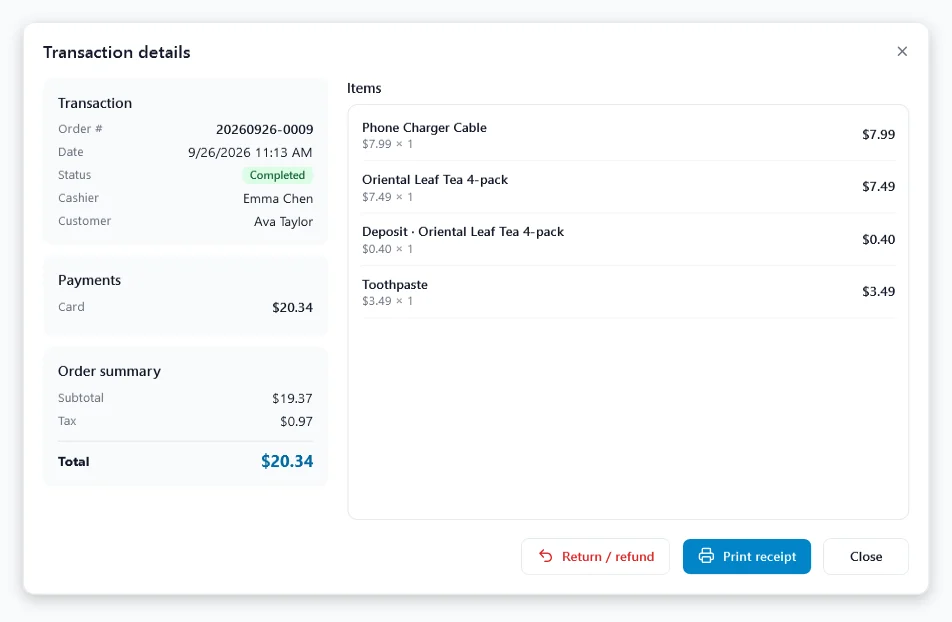
- View opens the details; the printer icon reprints the receipt.
 Enlarge
 Enlarge
Refunds (managers)
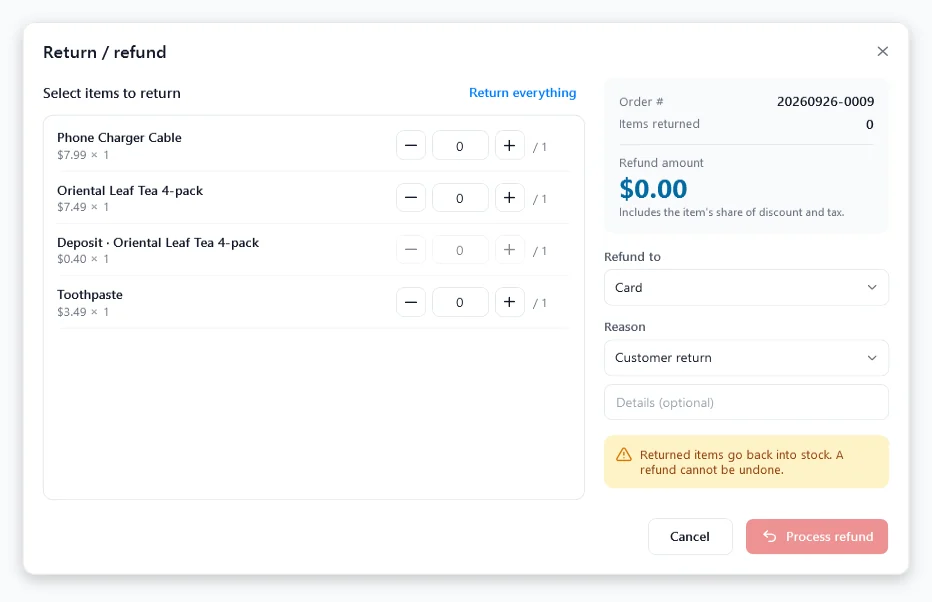
- Open the sale and tap Return / refund.
- Choose the quantity to return for each line, or tap Return everything. Bottle deposits follow their product.
- Choose where the money goes (by default the original payment method) and a reason.
- The refund amount includes the item’s share of discounts and tax and is exactly what will be paid out. Returning everything refunds exactly what the customer paid.
- Tap Process refund and confirm.
Returned items go back into stock, member points are taken back, and cash refunds are deducted from the current shift.
11. Products
 Full screen
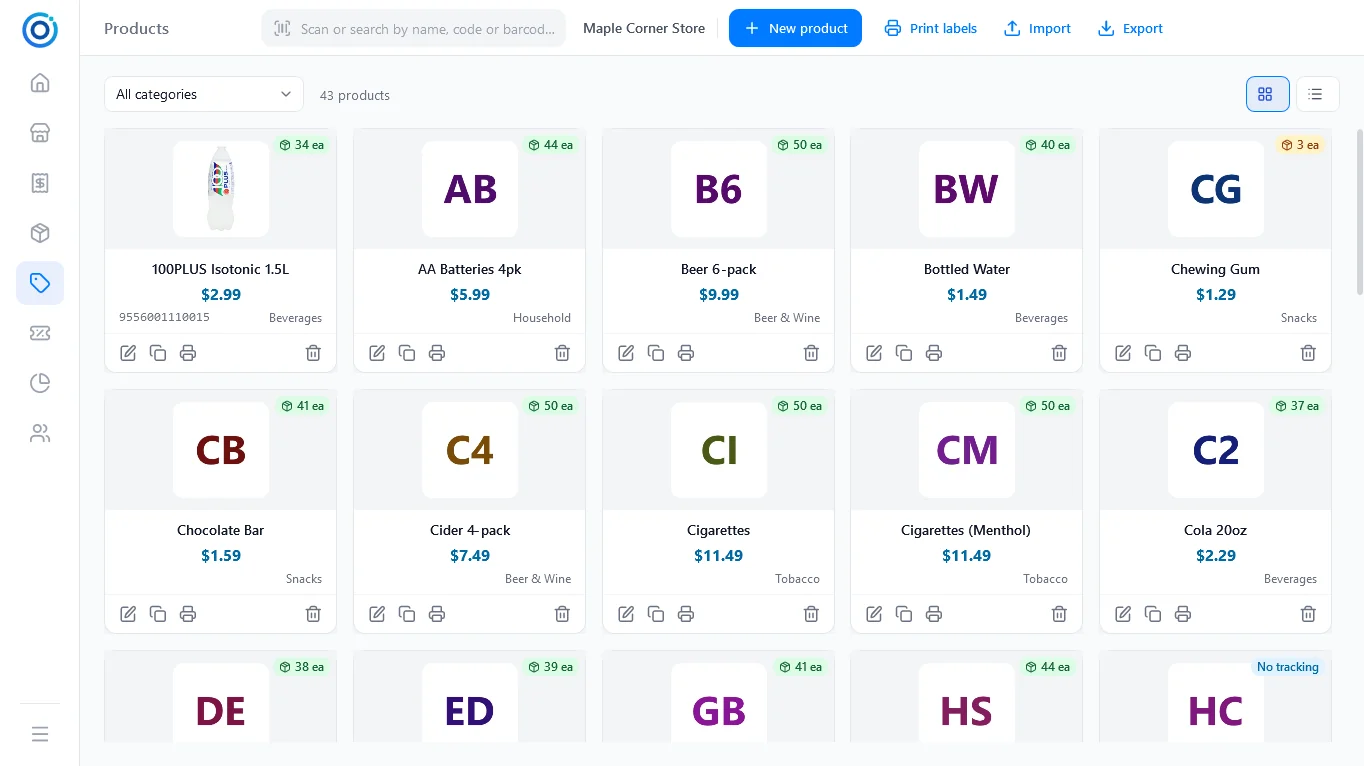
- Filter by category or search by name, code or barcode. Switch between grid and list view with the buttons on the right.
- The badge on each card shows the stock (green / amber / red), No tracking or Inactive.
- The icons on each card: Edit, Copy, Print label, Delete. Deleting a product does not change past sales.
Adding or editing a product
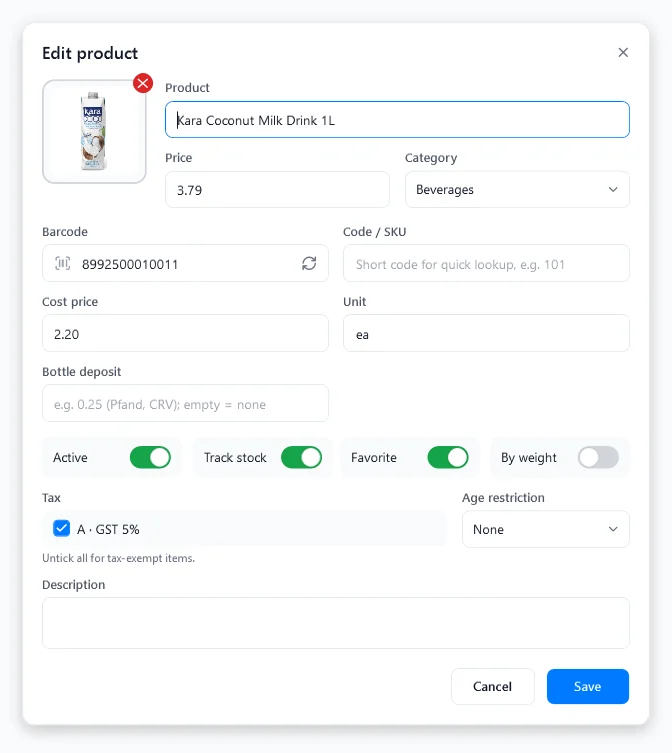 Enlarge
| Field | Notes |
|---|---|
| Picture | Tap the picture to choose a JPG, PNG or WebP photo. It is trimmed and centred on white automatically. Without a photo, a tile with the product’s initials is created (for example BW for Bottled Water). |
| Product, Price | A price of 0 makes it an open-price item (price entered at the till). |
| Category | Also decides the tab on the POS screen and the report grouping. |
| Barcode | Scan it, or tap the refresh icon to create an in-store EAN-13 barcode (starting with 20). |
| Code / SKU, Cost, Unit | Cost price is used for gross profit. |
| Bottle deposit | Deposit per item (CRV, Pfand …). |
| Flags | Active, Track stock, Favorite (puts it on the ★ Favorites tab) and By weight (price per kg or the unit you enter). |
| Tax | Tick the rates that apply; untick all for tax-exempt items. |
| Age restriction | 16 / 18 / 19 / 21 years. |
Opening stock can be entered for new products. After that, stock is changed only on the Inventory page, so every change is recorded. Save & new keeps the category, unit, tax and age settings for the next product.
Importing and exporting
 Enlarge
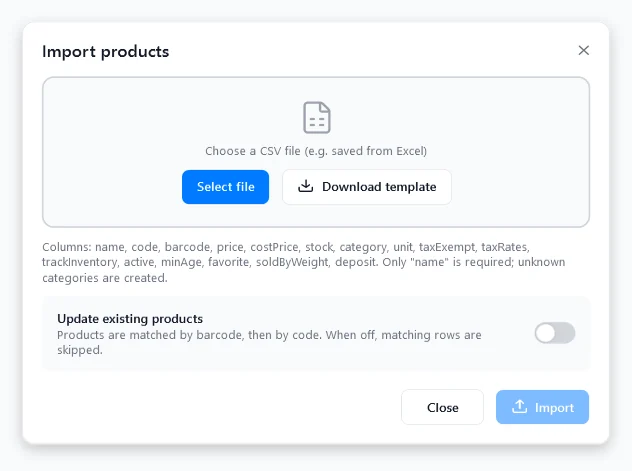
Export saves all products (or the selected category) as a CSV file that opens in Excel. Import reads a CSV file; Download template gives an example. Only the name column is required and columns can be in any order. Existing products are matched by barcode, then by code; turn on Update existing products to update them (columns missing from the file are left unchanged). Rows with errors are listed with their line number. The taxRates column holds a product’s own tax rates as percentages (5, or 5;7); leave it empty for the default rates.
Printing labels
 Enlarge
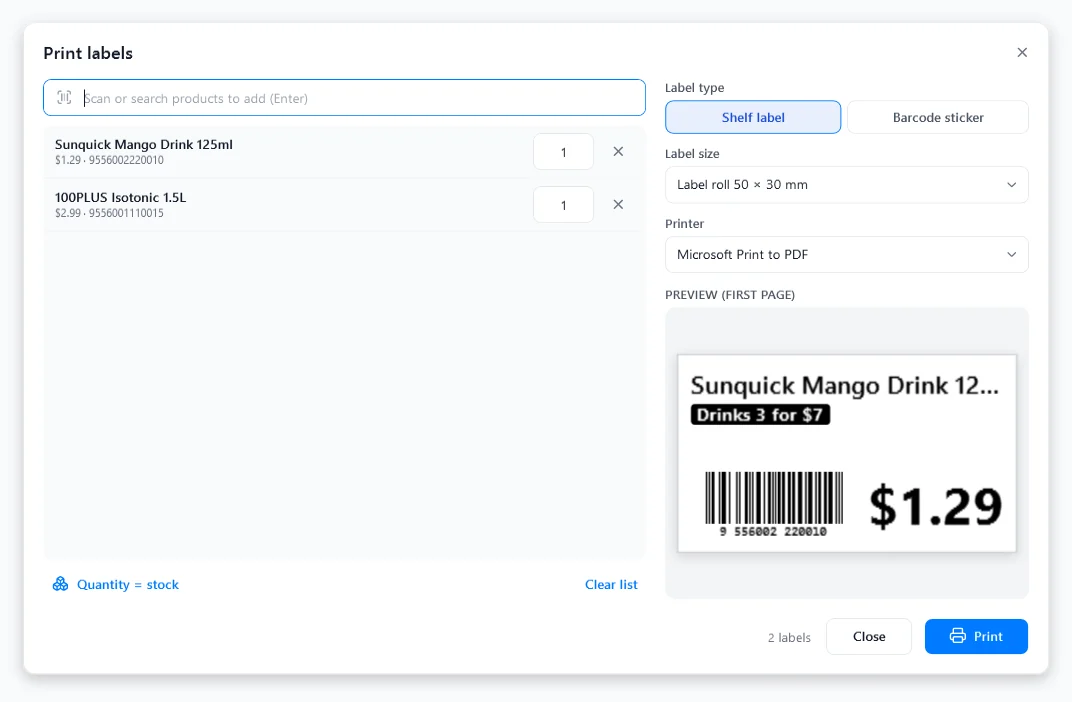
Print labels (top bar) or the printer icon on a product. Scan or search to add products and set how many labels each; Quantity = stock prints one per item in stock (handy after a delivery).
- Shelf label: name, current promotion, barcode and a large price.
- Barcode sticker: name, full-width barcode and price.
- Label sizes: rolls of 40×30, 50×30, 58×40 or 62×29 mm, or A4 / Letter sheets. Choose the printer; the preview shows the first page.
Need custom label layouts? Try our Label Designer.
12. Inventory
 Full screen
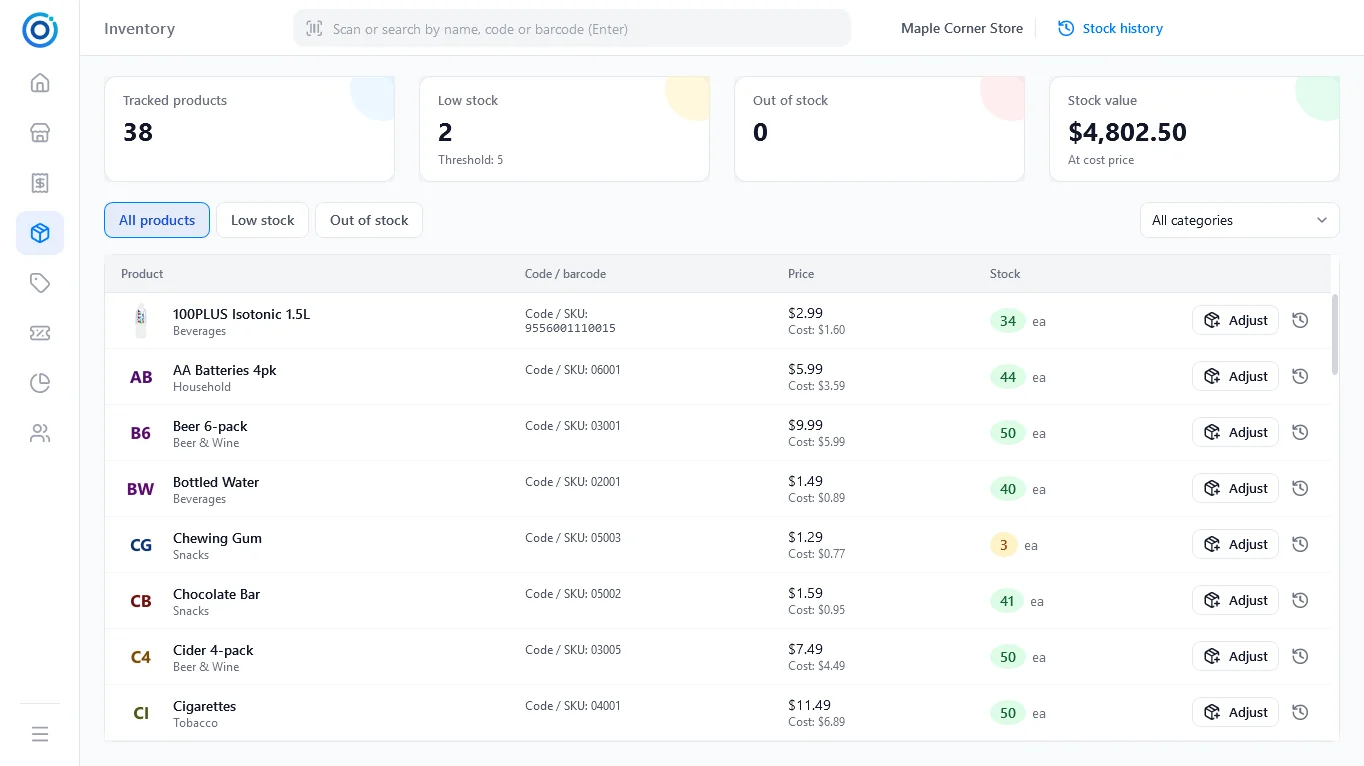
The cards show the number of tracked products, low-stock and out-of-stock counts, and the stock value at cost. Filter by All / Low stock / Out of stock and by category.
Adjusting stock
 Enlarge
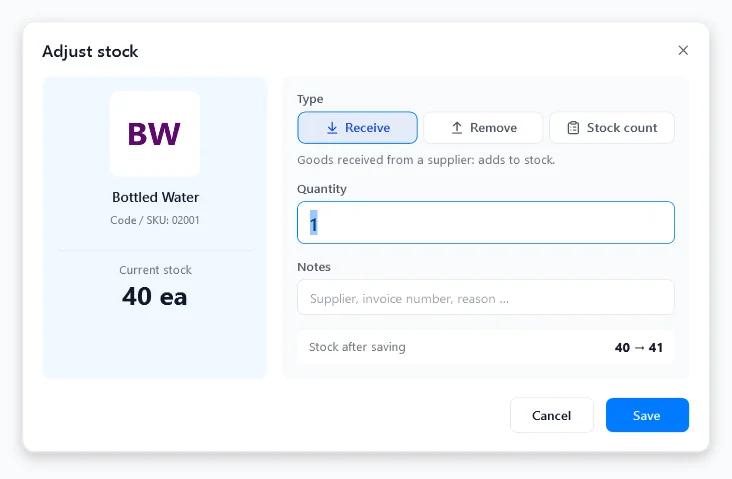
Tap Adjust (or scan a barcode in the search box — a single match opens the adjustment directly):
- Receive — goods delivered (adds to stock).
- Remove — damaged, expired, own use (subtracts).
- Stock count — enter what you counted; the difference is recorded.
The dialog shows the stock after saving. Products that do not track stock have no Adjust button.
Stock history
 Full screen
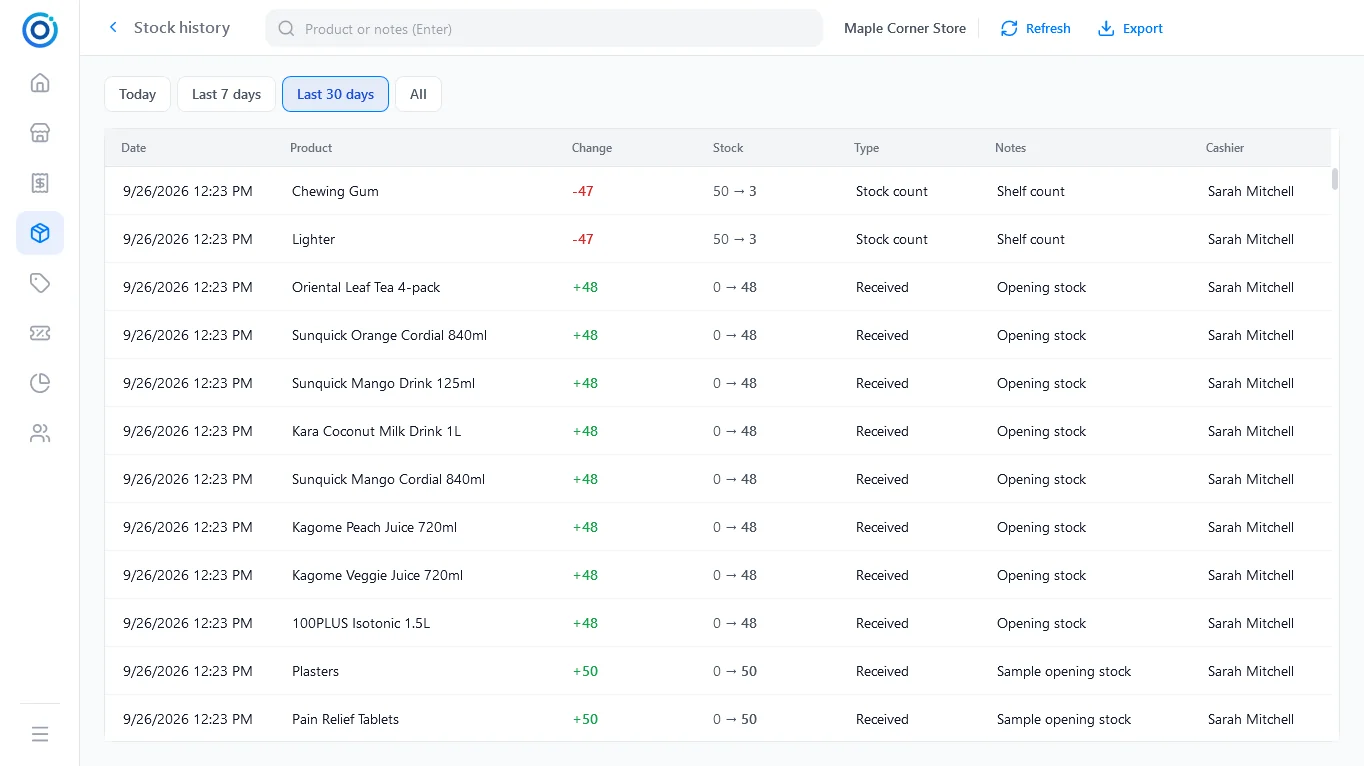
Every change — sale, return, receipt, adjustment, count — with the stock before and after, the document and the person. Open it with Stock history at the top, or the clock icon on a product. Export saves it as CSV.
13. Promotions
 Full screen
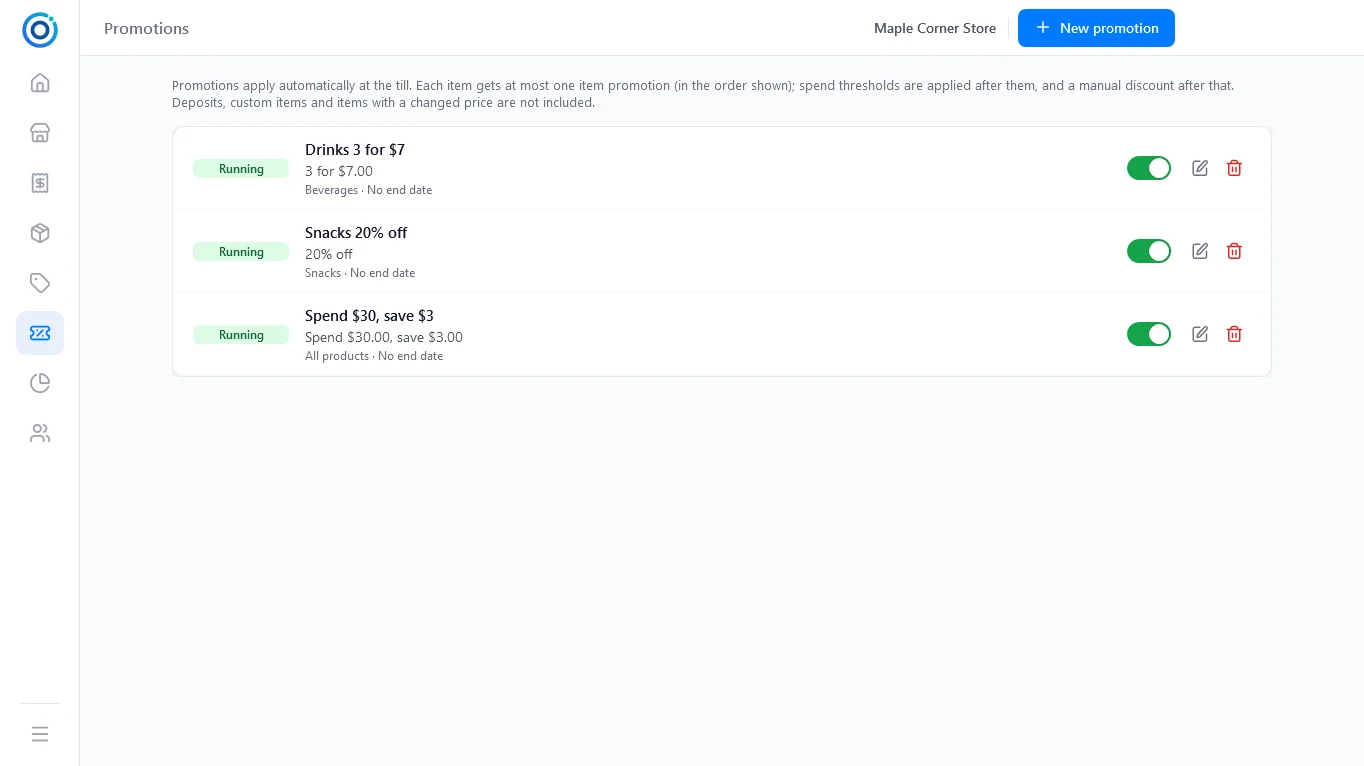
Promotions are applied automatically at the till. Each item gets at most one item promotion (in the order of the list); spend thresholds are applied after them, and a manual discount after that. Deposits, custom items and items with a changed price are not included. The switch turns a promotion on or off.
 Enlarge
| Type | Example |
|---|---|
| Multi-buy (N for price) | Drinks 3 for $7 — any 3 qualifying items, mixed |
| Buy N, get the next discounted | Second one half price (1, 50 %), buy one get one free (1, 100 %) |
| Percent off | Snacks 20 % off |
| Spend threshold | Spend $30, save $3 — on the whole order |
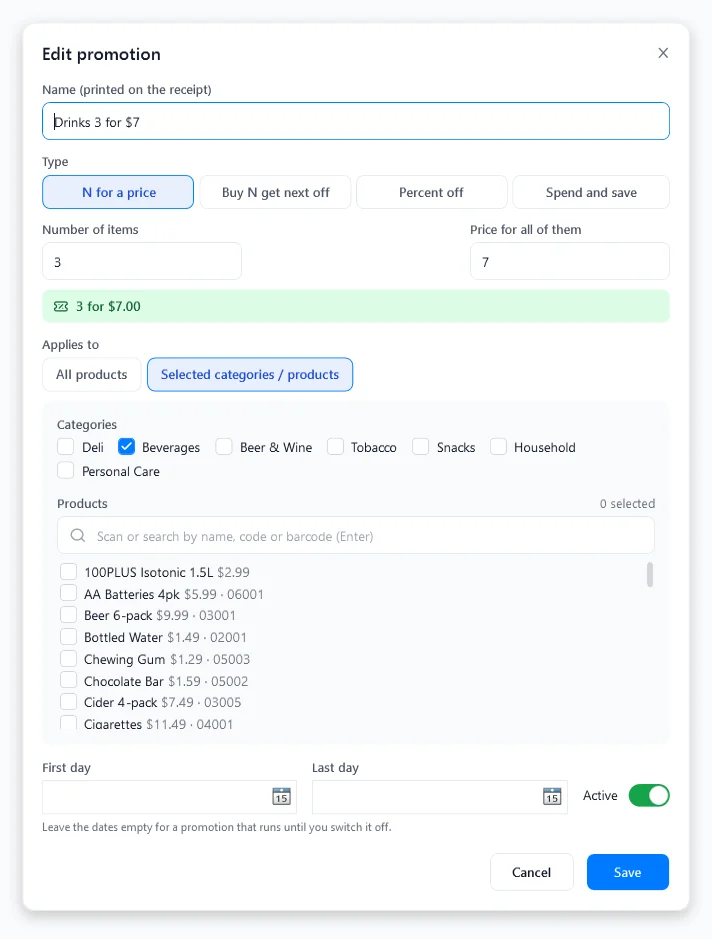
Choose whether it applies to all products or to selected categories / products, and optionally a start and end date. Receipts and reports list the saving of every promotion.
14. Reports
Choose the period at the top (Today, Yesterday, This week, This month, Last month, Custom) and a tab. Every tab can be exported to CSV with Export; Print prints the summary on the receipt printer (choose Today for an end-of-day report).
Summary
 Full screen
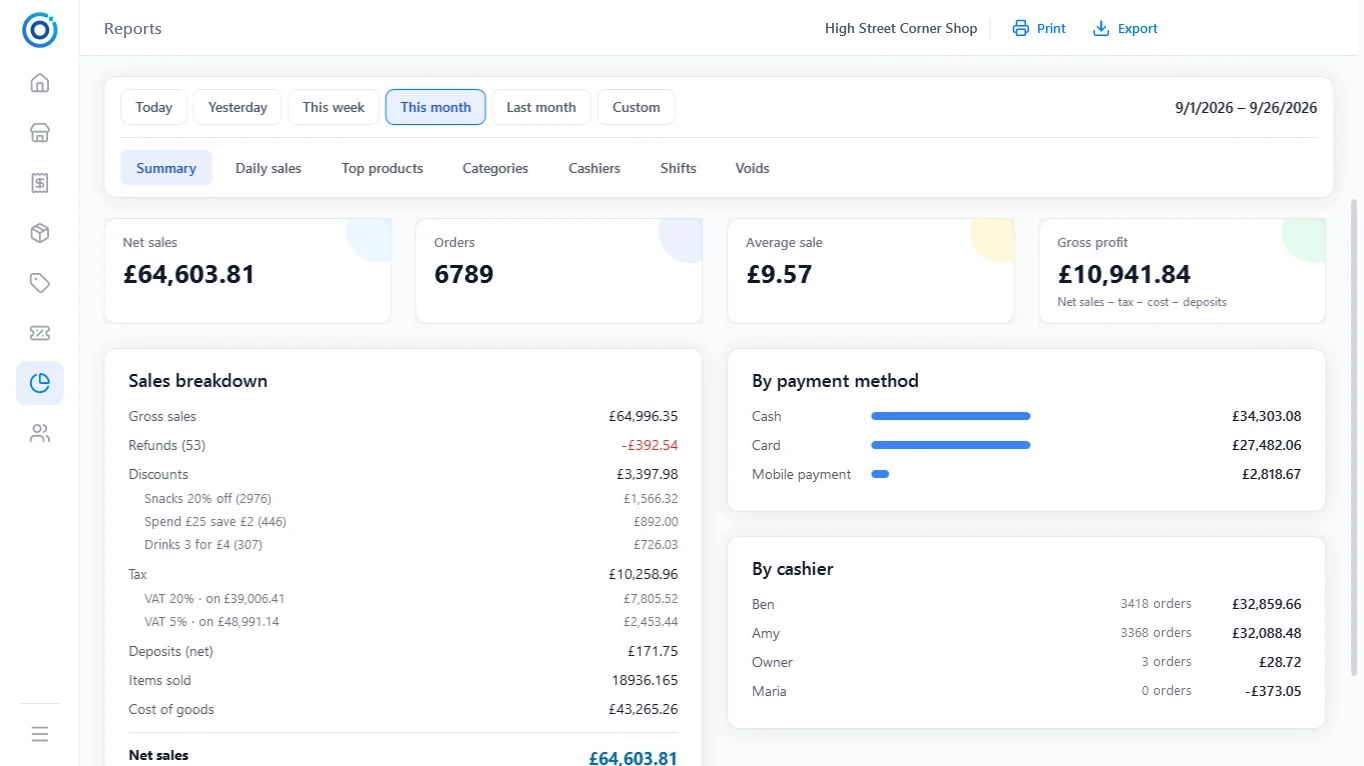
The cards show net sales, orders, average sale and gross profit (net sales − tax − cost − deposits). Below them: the sales breakdown (gross sales, refunds, discounts with every promotion, tax per rate with the taxable amount for VAT returns, deposits, items sold and cost), by payment method and by cashier.
 Full screen
 Full screen
 Full screen
 Full screen
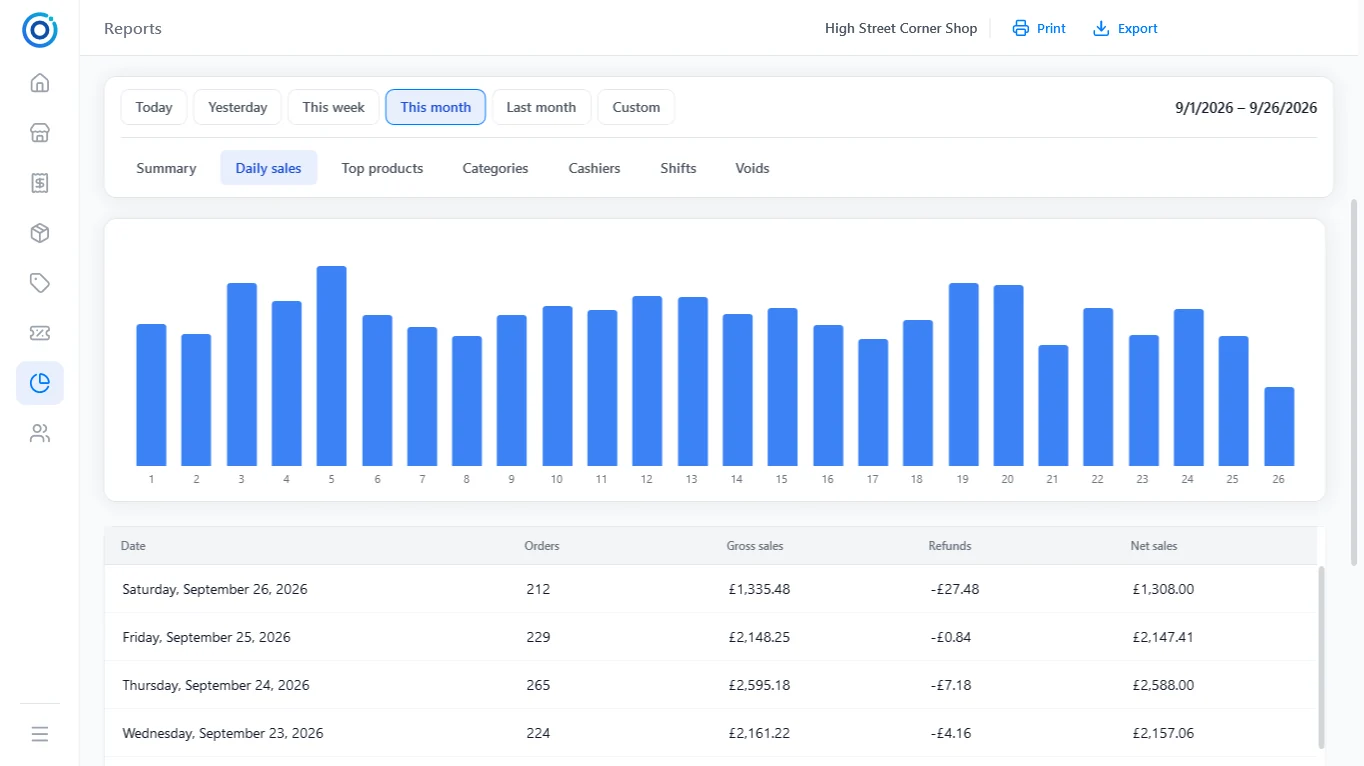
- Daily sales — orders, gross sales, refunds and net sales per day. Busy and quiet days stand out at a glance.
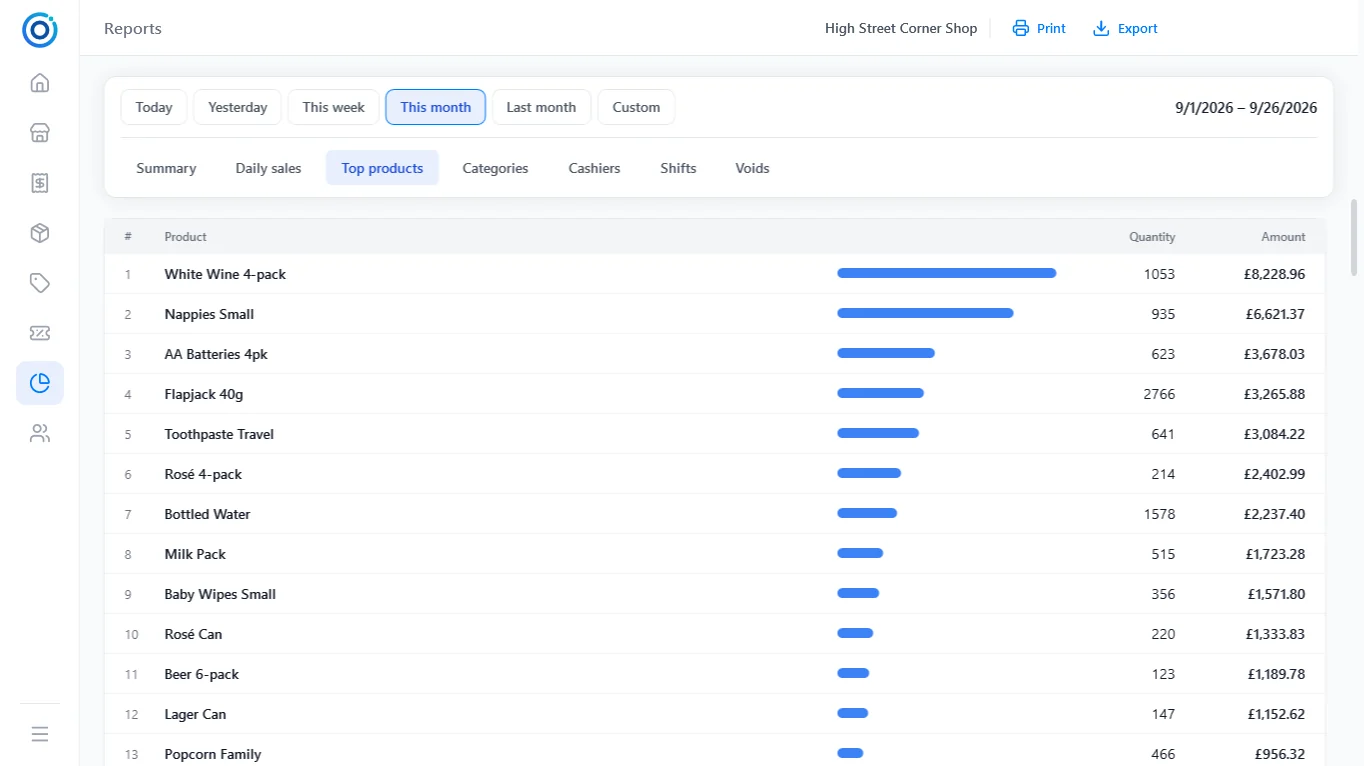
- Top products — products by revenue, with the quantity sold. Bottle deposits are not counted.
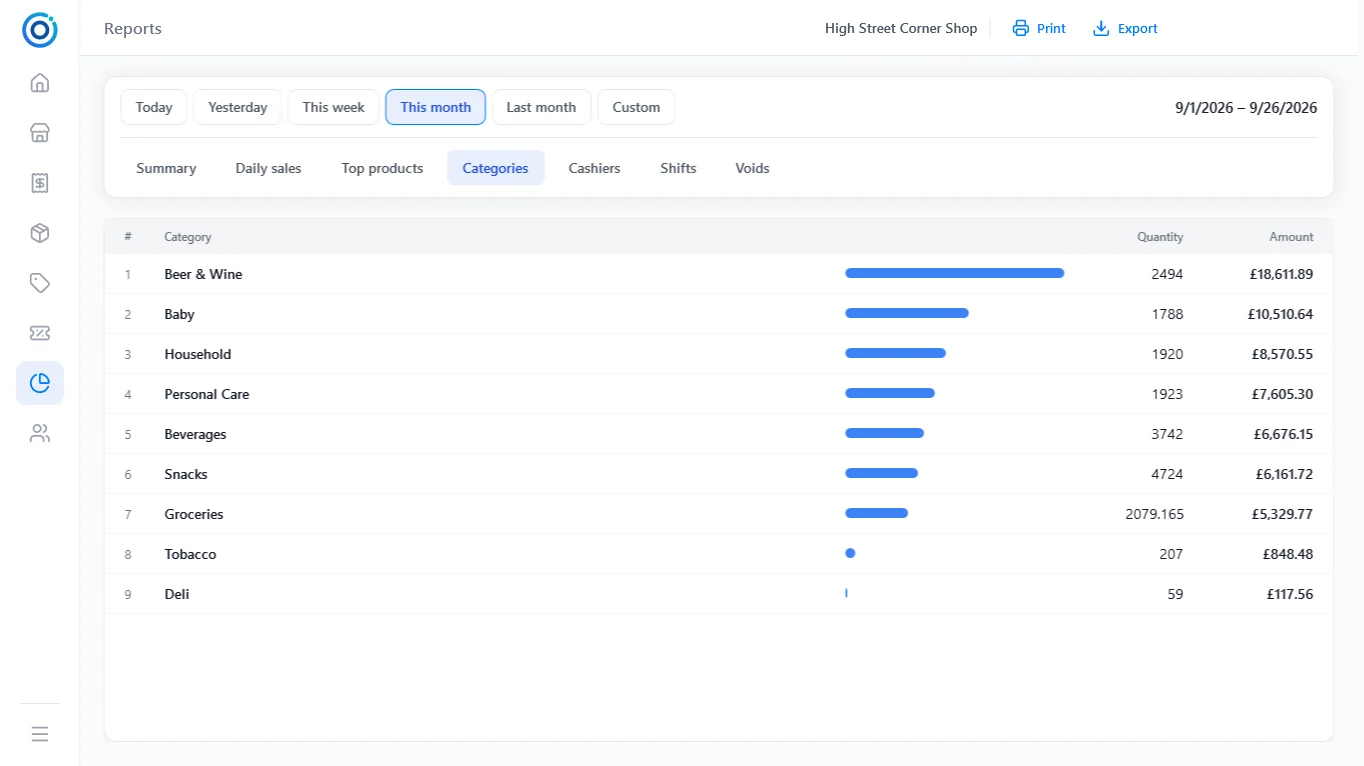
- Categories — sales per category. Custom items count under the category chosen when they were rung up.
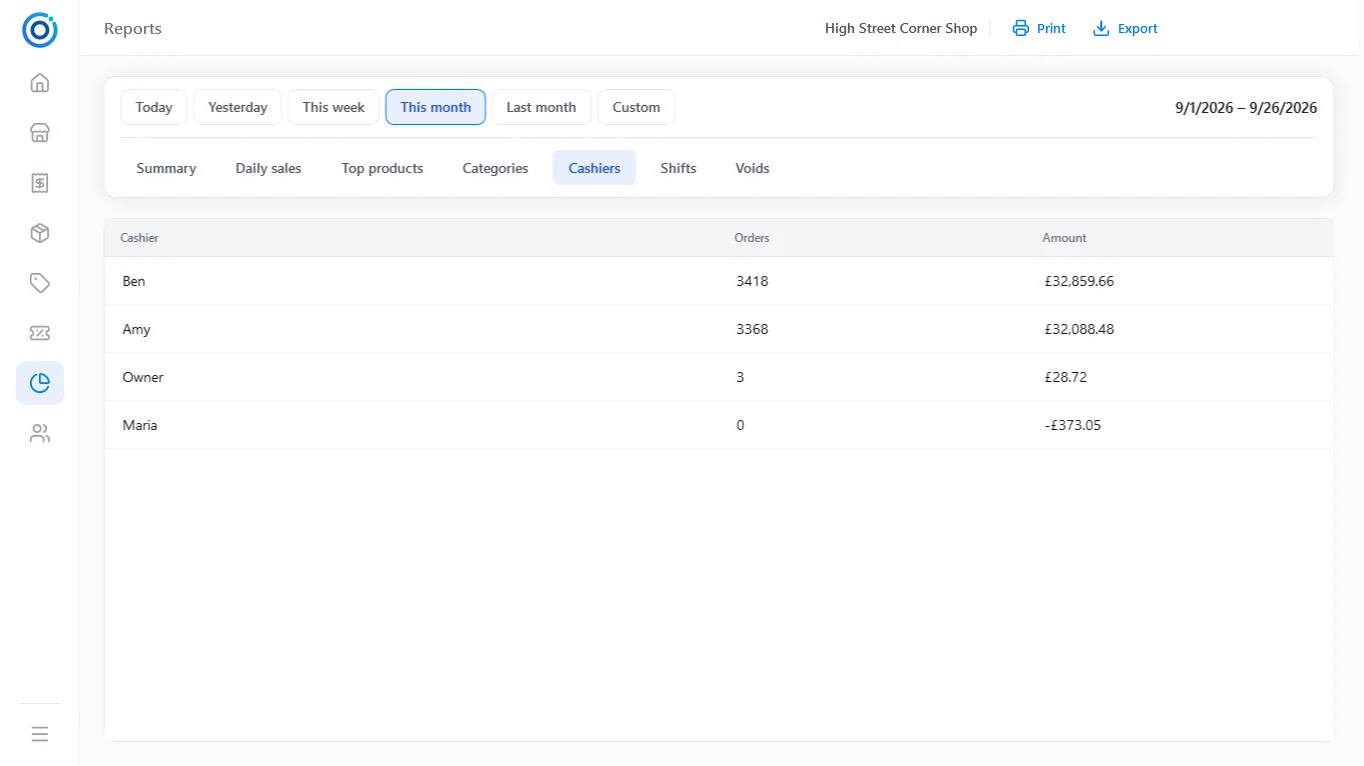
- Cashiers — orders and amount per cashier. Refunds are counted under the person who gave them.
Shifts
 Full screen
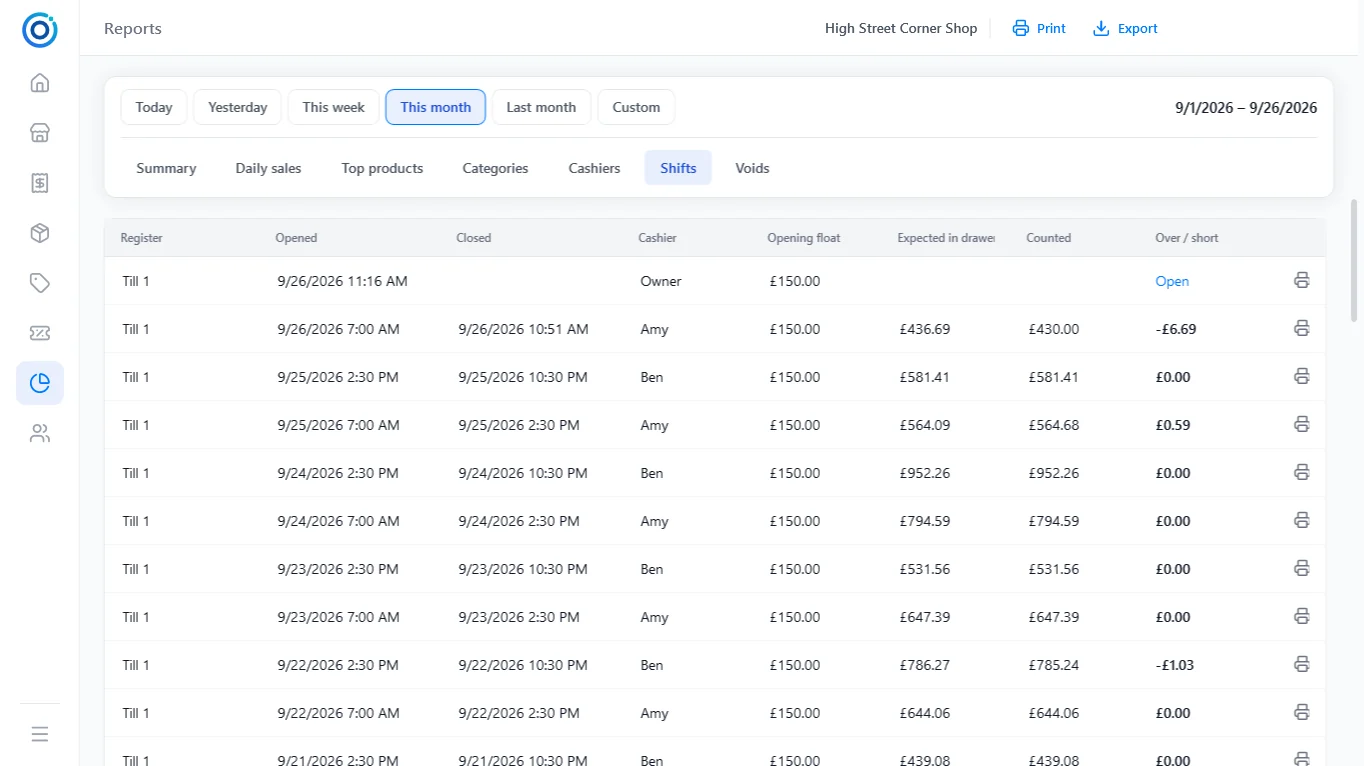
Every shift is listed with its register, open and close times, cashier, float, expected cash, counted cash and over/short. The shift that is still open shows Open. Use the printer icon to reprint any shift report.
Voids
 Full screen
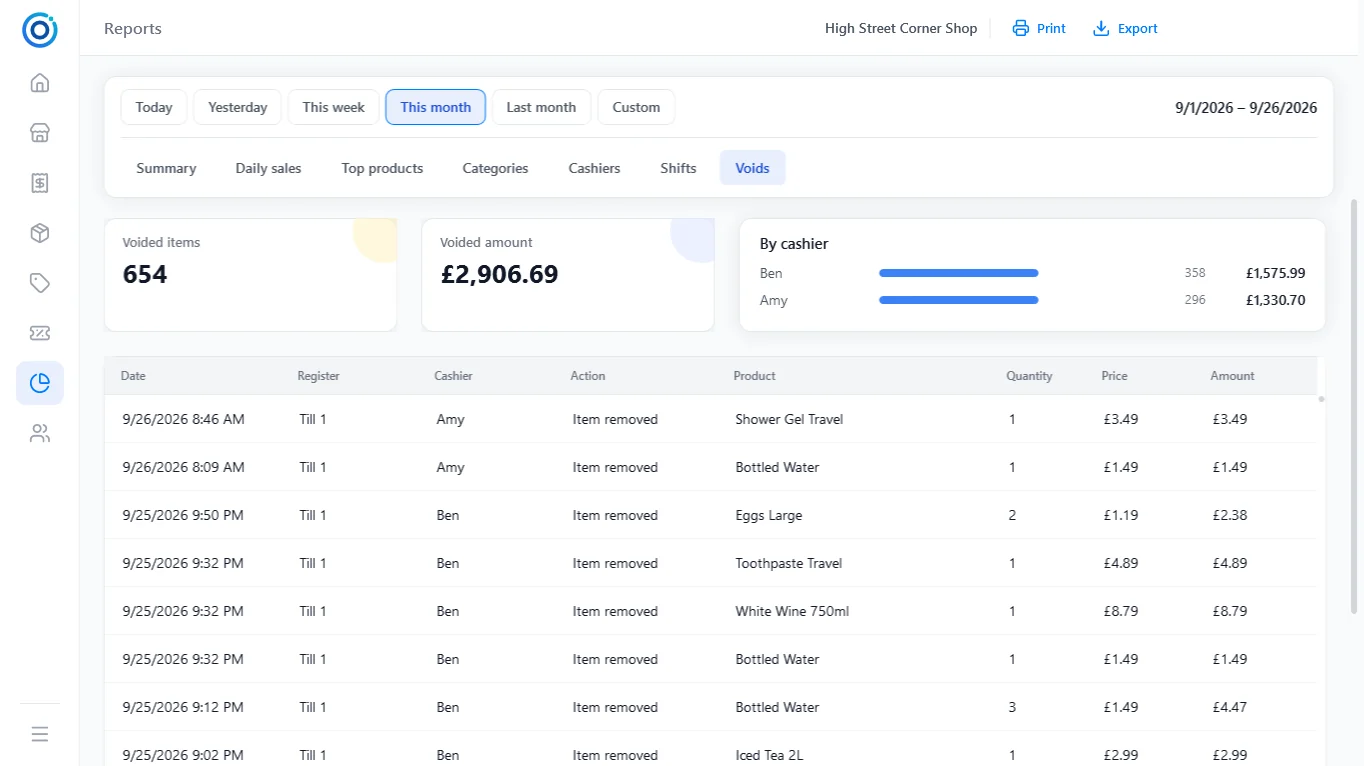
Removed items, lower quantities or prices, cleared carts and deleted held orders, per cashier. A cashier with far more voids than the others is worth a closer look.
15. Members (loyalty)
 Full screen
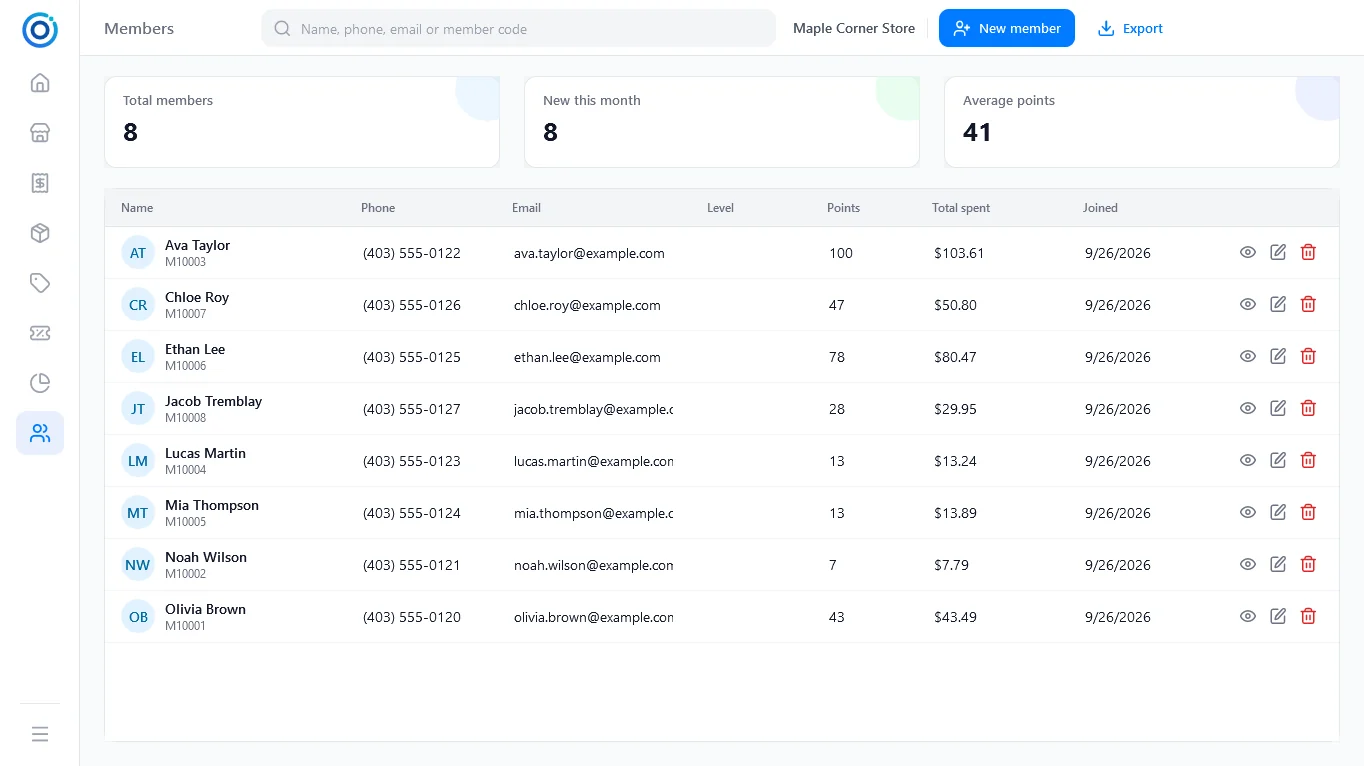
Search by name, phone, email or member code; add, edit or delete members. Phone numbers and member codes must be unique; leave the member code empty to number members automatically (M10001, M10002 …).
Members earn points on every purchase (1 point per currency unit by default, see Settings → Checkout); points and total spent are reduced again for refunds.
 Enlarge
16. Settings
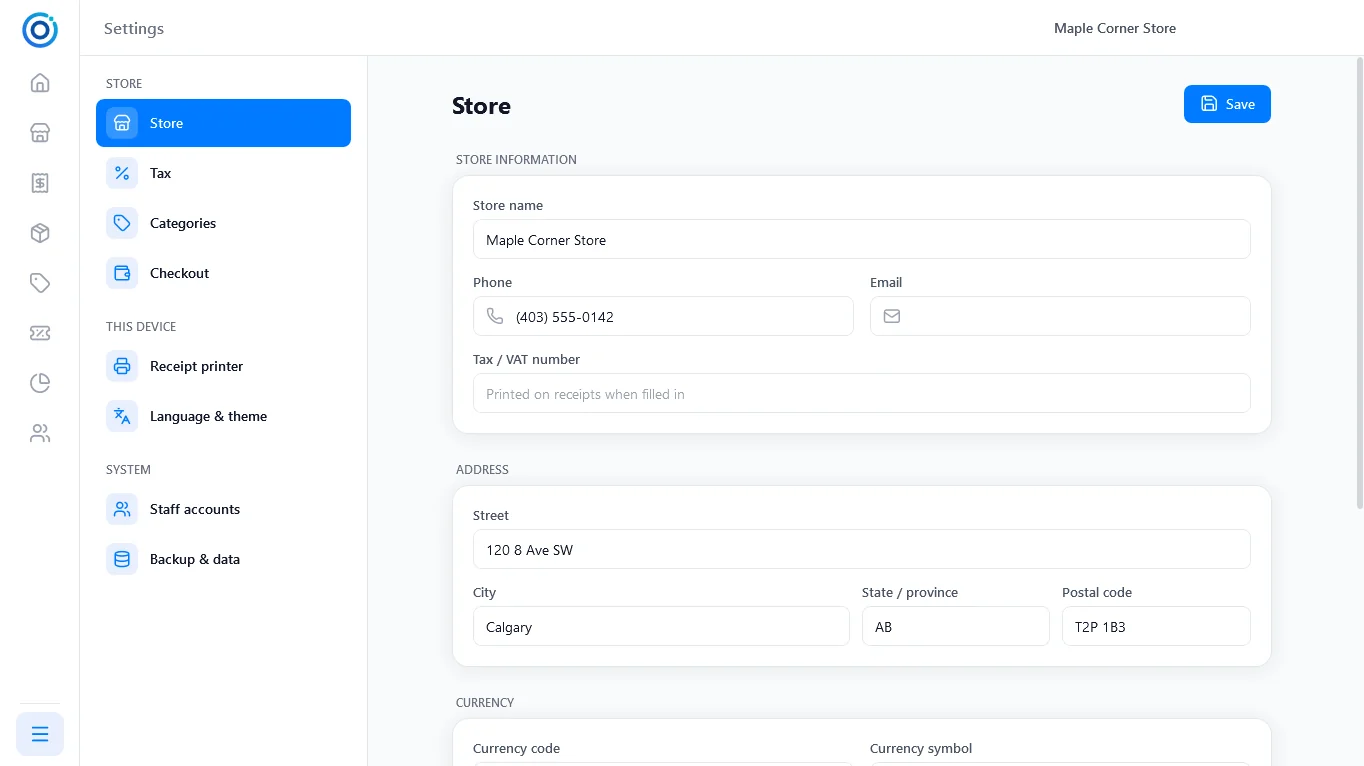
Settings are for admins (menu button ☰ → Settings). Store settings are shared by all registers; This device settings apply to this computer only.
Store
 Full screen
Store name, phone, email, tax/VAT number, address, currency, and the receipt header and footer text.
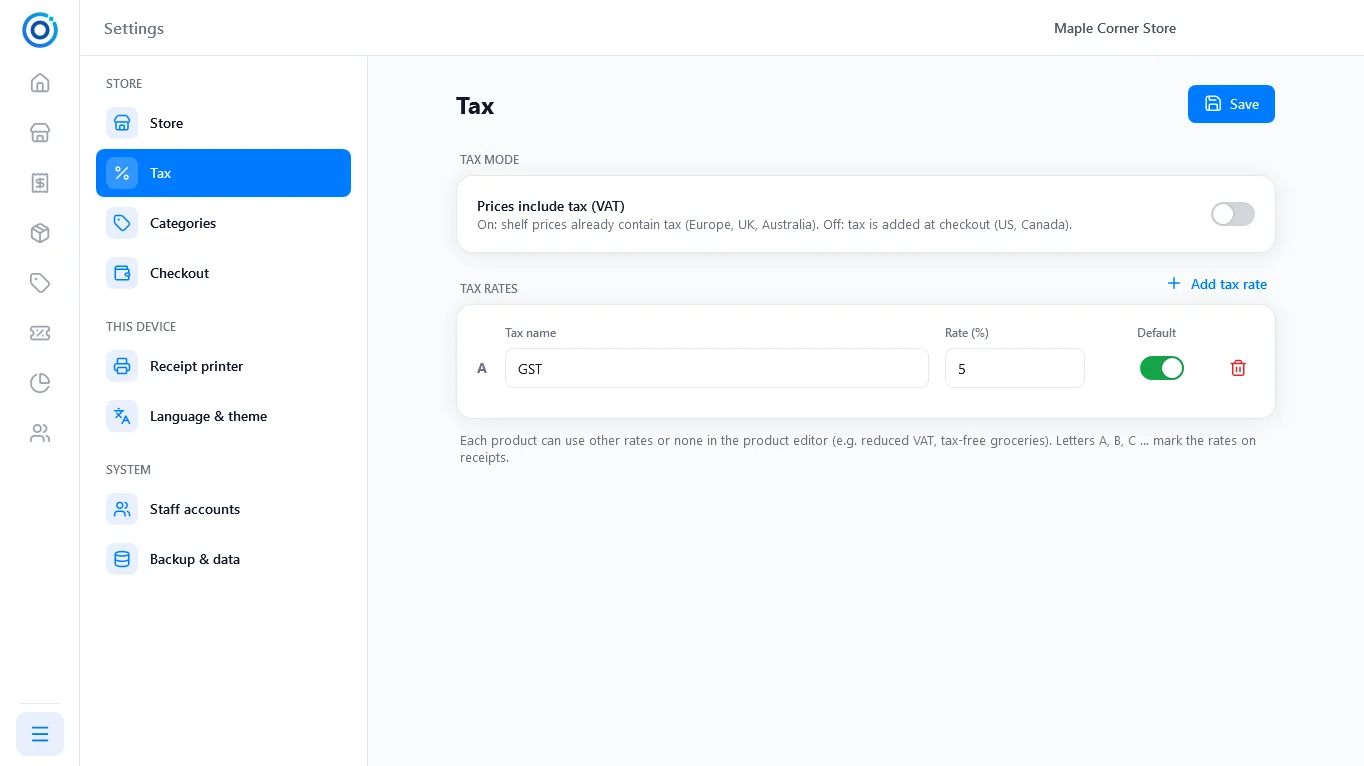
Tax
 Full screen
- Prices include tax (VAT): on = shelf prices contain the tax; off = tax is added at checkout.
- Tax rates: name, rate and whether it is a default rate. Default rates apply to every product that does not choose its own. With prices including tax, normally only the standard rate is default; reduced rates are ticked on the products that use them. The letters A, B, C … mark the rates on receipts.
Canadian stores: GST is preset. Add your province’s PST or use the HST rate here.
Categories
 Full screen
Add, rename, colour, reorder (this is the tab order on the POS screen) and delete categories. A category can carry an age restriction for all its products.
Checkout
 Full screen
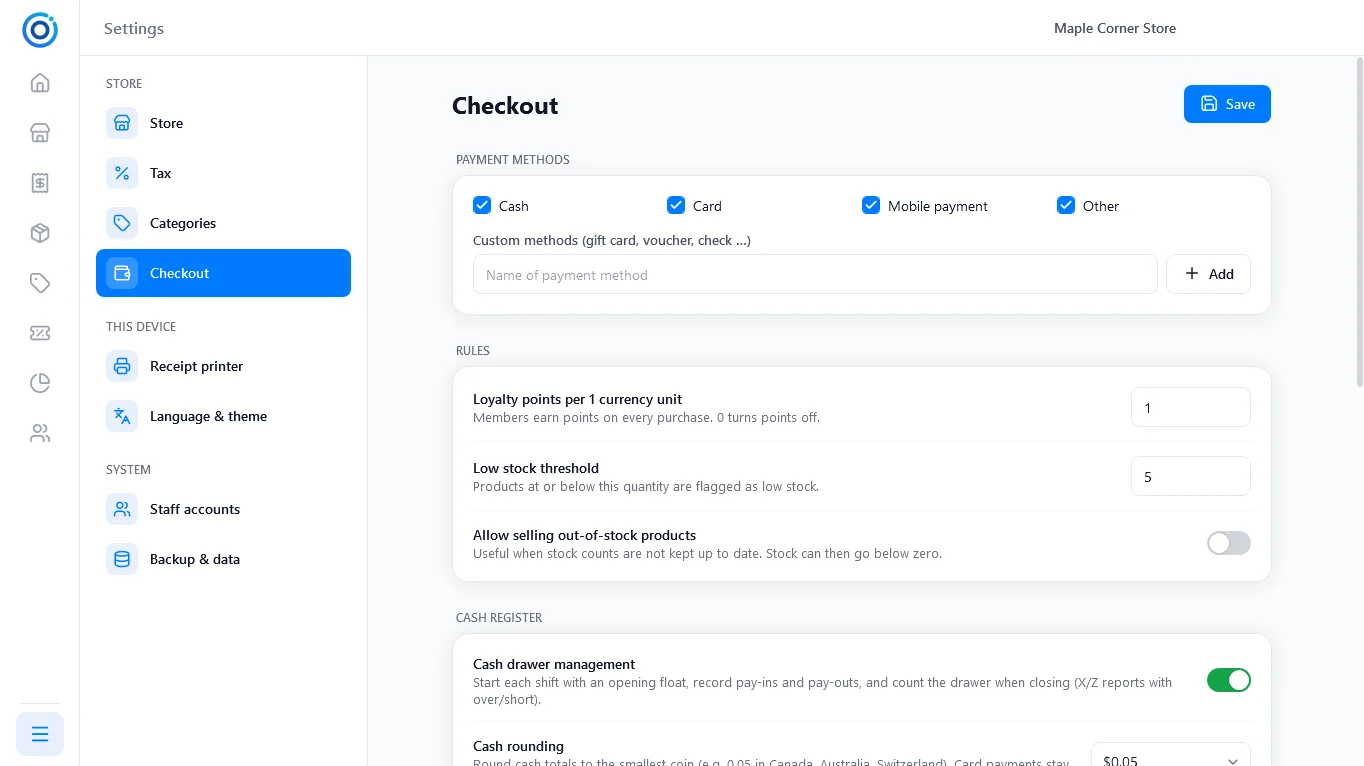
Payment methods (and custom ones such as gift cards), loyalty points per currency unit, low-stock threshold, allow selling out-of-stock products, cash drawer management, cash rounding, whether cashiers may change prices, bottle deposit taxation, scale barcodes, and the order number format.
Receipt printer
 Full screen
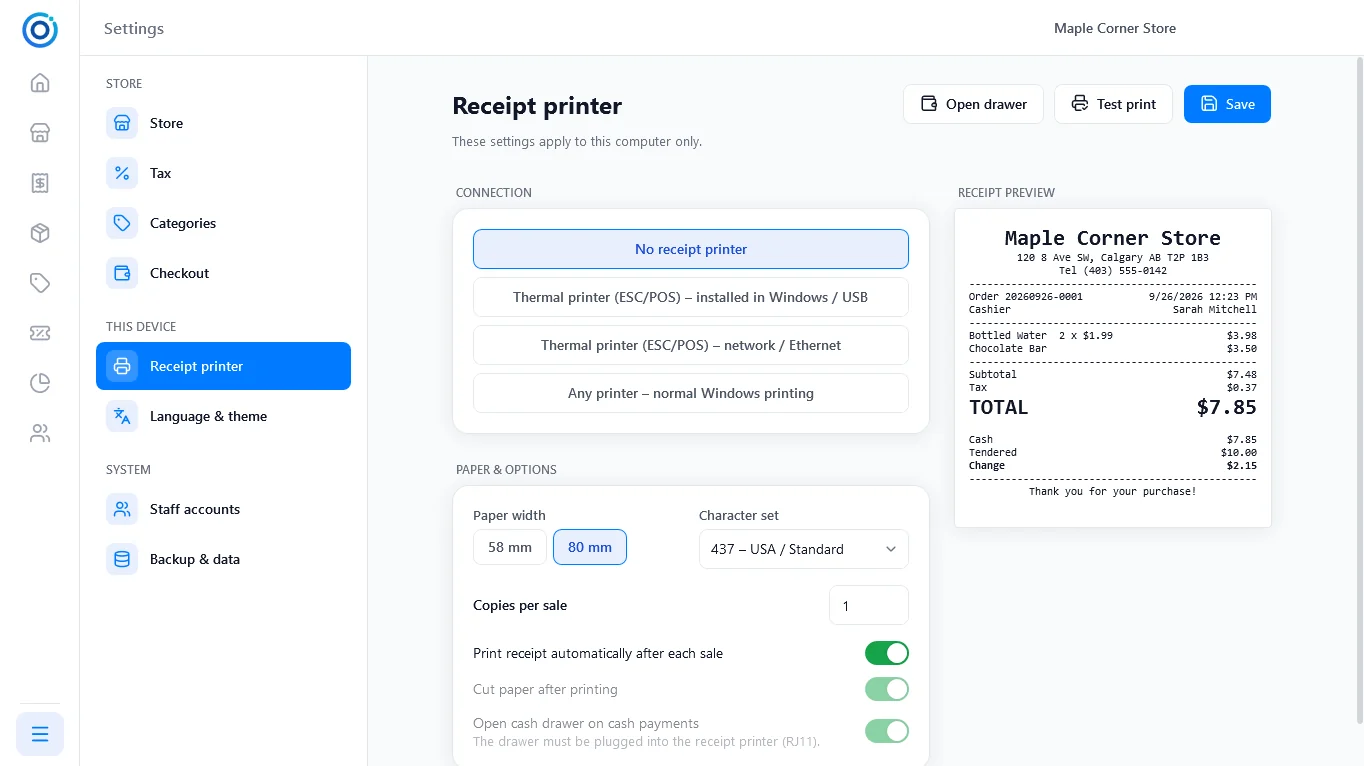
- Connection: no printer; thermal printer (ESC/POS) installed in Windows / USB; thermal printer on the network (IP address, port 9100); or any Windows printer.
- Paper width: 58 mm (32 characters per line) or 80 mm (48 characters). The preview on the right shows the result.
- Character set: 437 (US), 858 for Europe (accents and €), 936 for Chinese, 932 for Japanese.
- Copies per sale, automatic printing, paper cut, open the cash drawer for cash payments. Test print and Open drawer check the connection.
Looking for a printer? See our ESC/POS receipt printers.
Language & theme
 Full screen
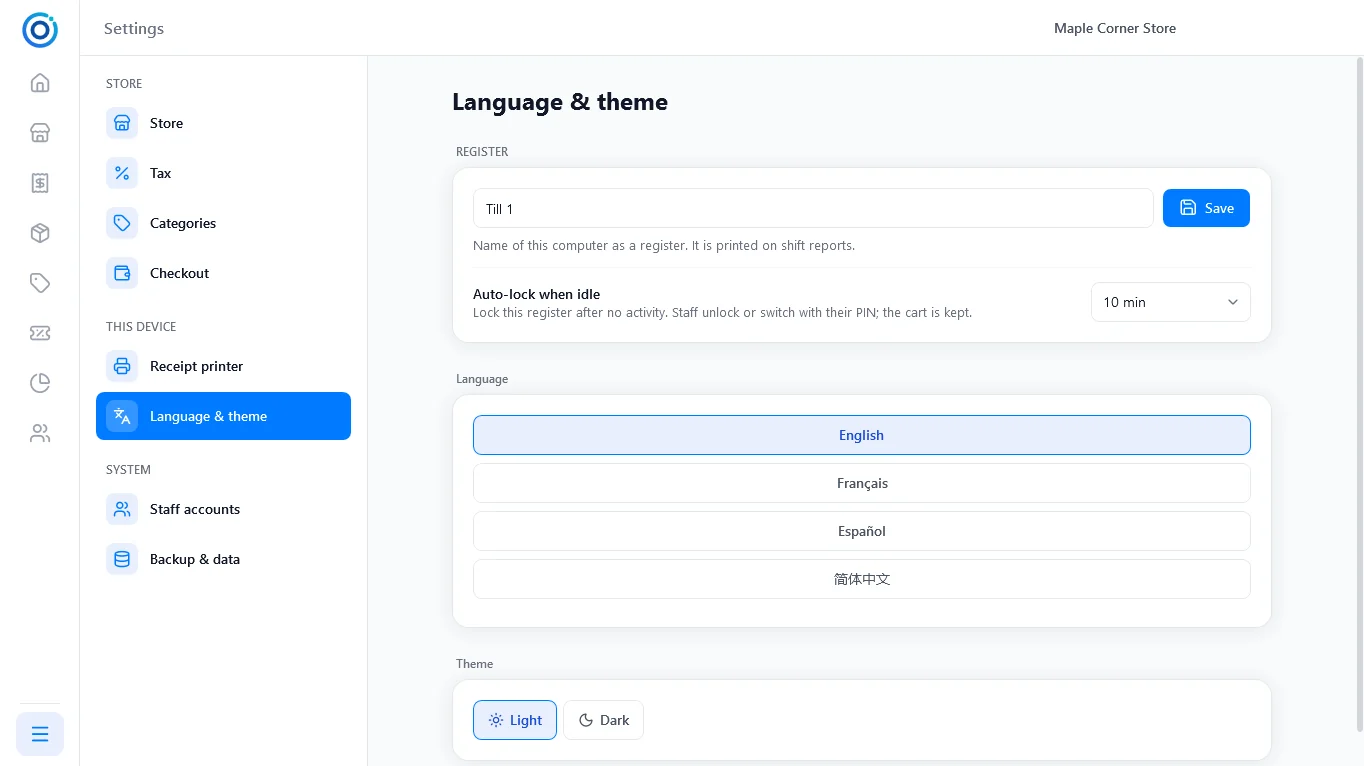
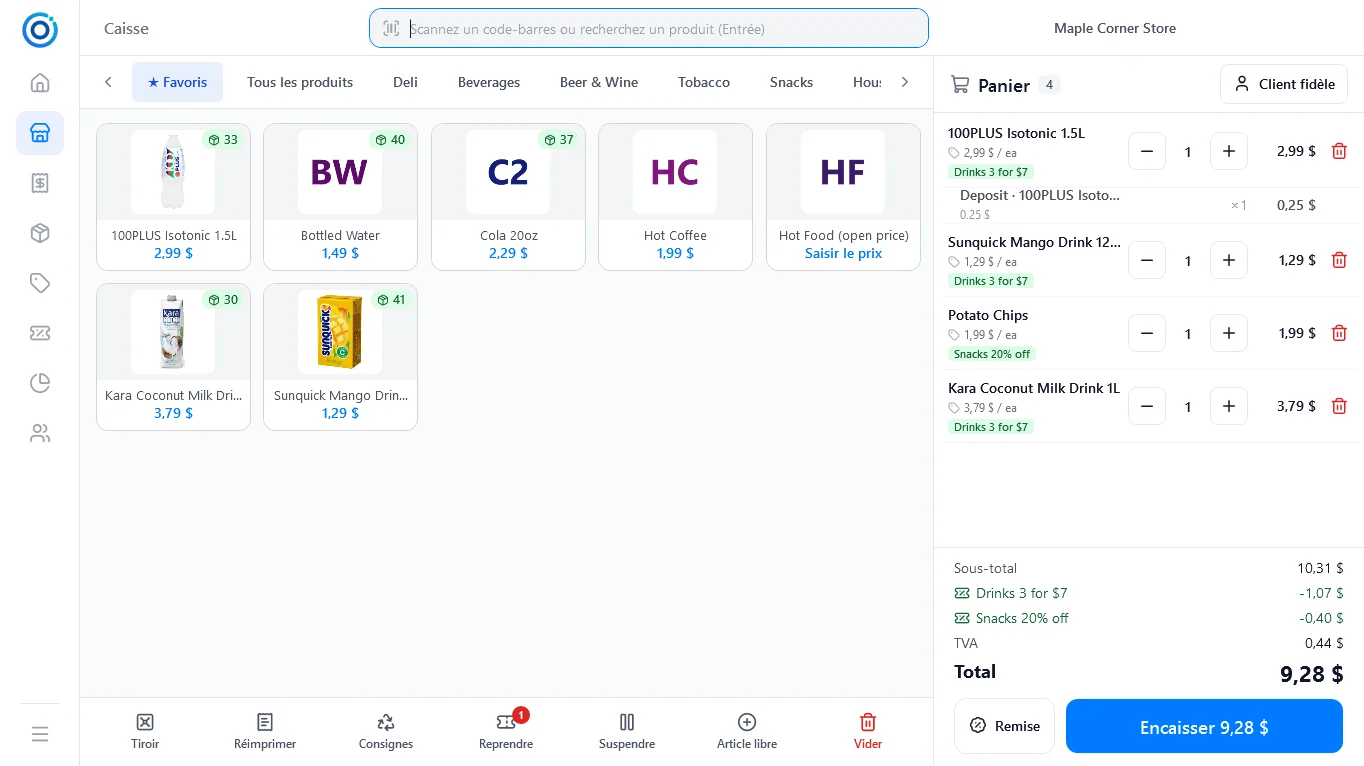
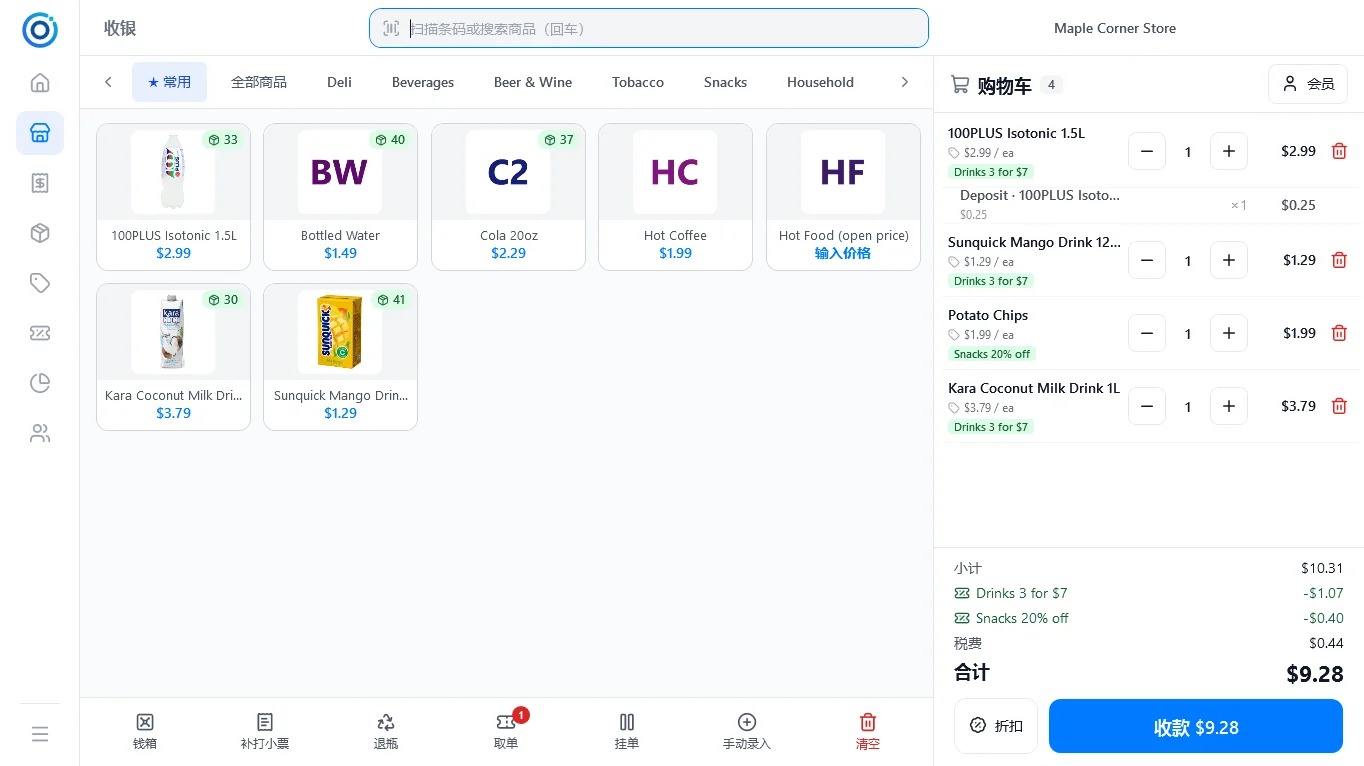
Register name (printed on shift reports), automatic lock after inactivity (never / 2 / 5 / 10 / 15 / 30 minutes), language (English, Français, Español, 简体中文) and light / dark theme. The change takes effect immediately; the cart and held orders are kept. Amounts follow the language: $1,234.50 in English, 1 234,50 $ in French, 1.234,50 $ in Spanish.
Staff accounts
 Full screen
 Enlarge
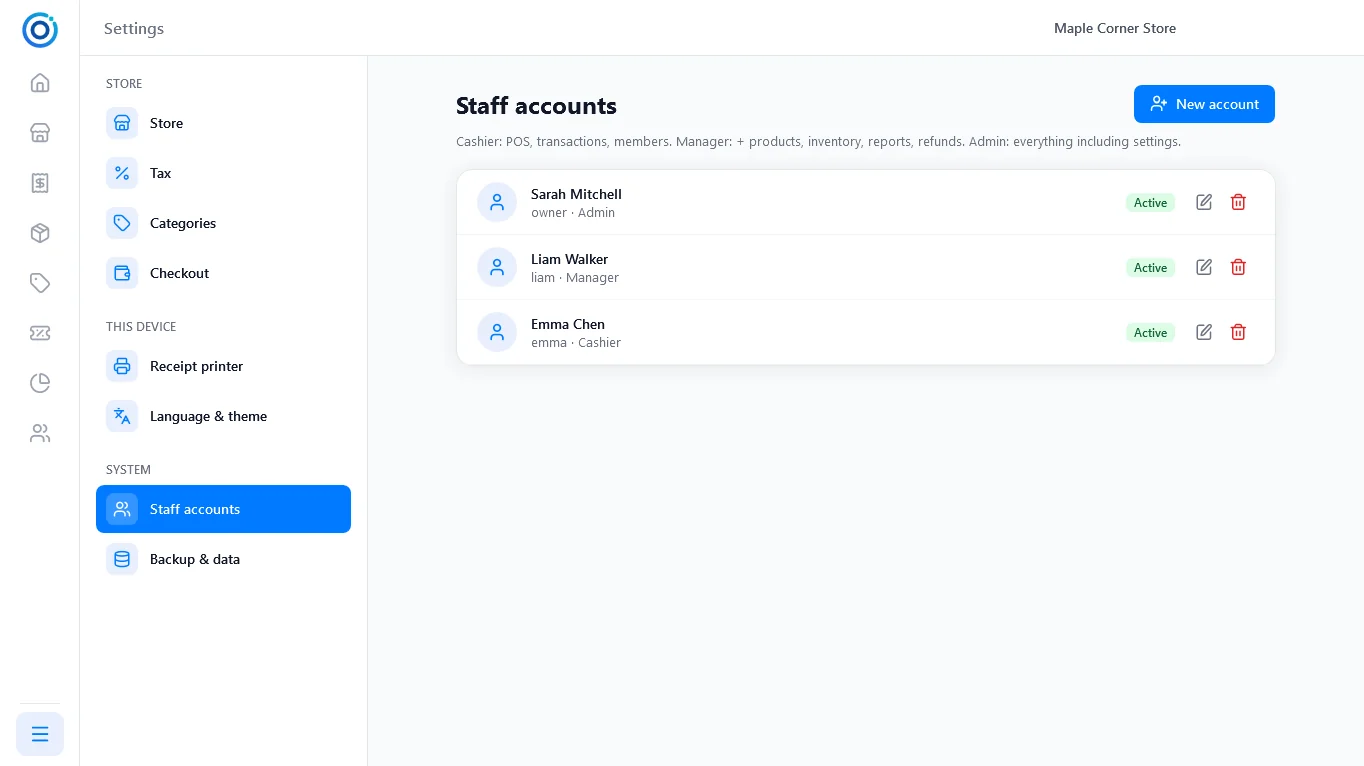
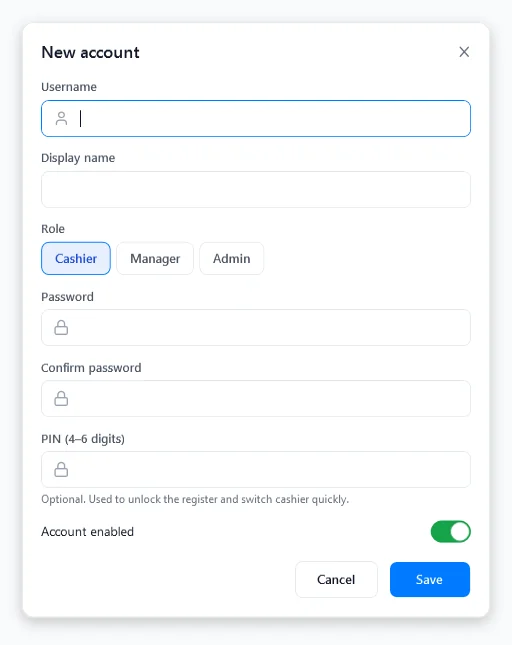
Add staff with a user name, display name, role (Cashier / Manager / Admin), password and an optional 4–6 digit PIN for quick unlocking and switching. Accounts can be disabled. The account you are signed in with cannot be deleted, and at least one active admin is always kept.
Backup & data
 Full screen
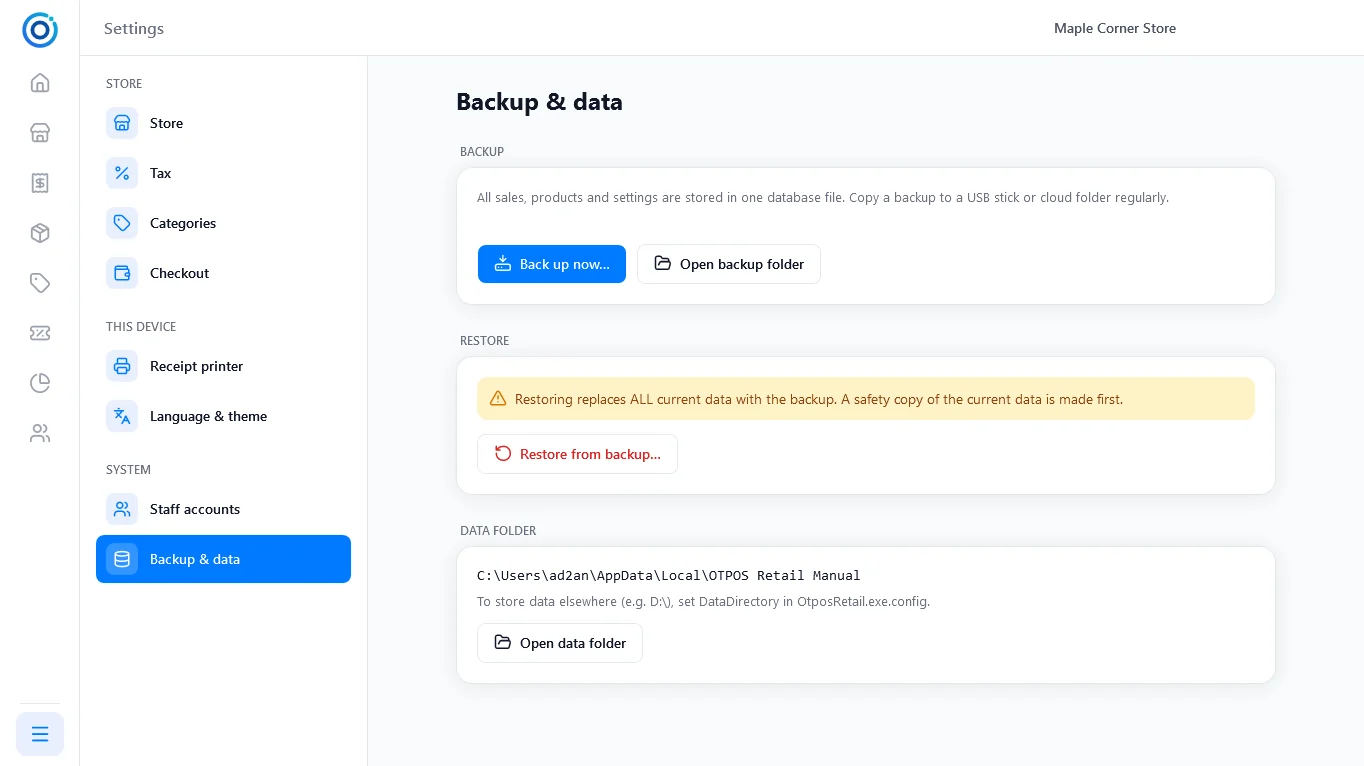
- The program backs up automatically on the first start of every day and keeps the last 14 backups.
- Back up now… saves a copy anywhere, for example on a USB stick. Do this regularly.
- Restore from backup… replaces all current data with a backup. A safety copy of the current data is made first.
- Open data folder shows where the database, images and logs are stored.
About
 Enlarge
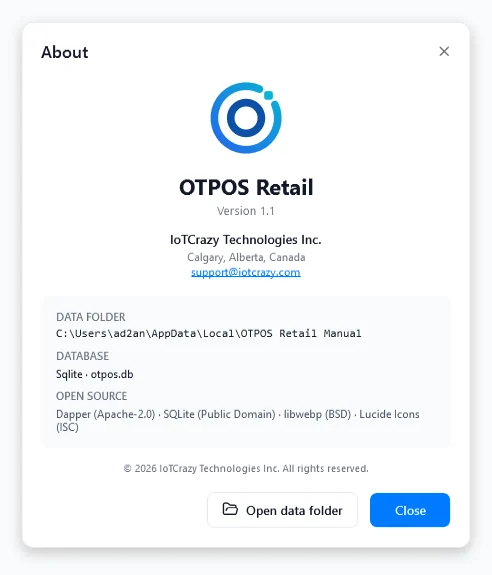
Tap the logo at the top of the left bar to see the version, the data folder and the open-source components.
17. Keyboard shortcuts
| Key | Action |
|---|---|
| Any character | Goes to the scan / search box on the POS screen |
| Enter | Scan / search |
3* + scan | Add 3 of the item |
| F12 | Charge (take payment) |
| F9 | Cash drawer menu |
| F8 | Hold the current sale |
| F11 | Full screen on / off |
| Ctrl+L | Lock the register |
| Esc | Close the current dialog |
18. Troubleshooting
| Problem | What to check |
|---|---|
| The receipt does not print | Settings → Receipt printer → Test print. Check the printer name / IP address and that the printer is on. |
| The cash drawer does not open | It must be connected to the receipt printer, and the printer must use an ESC/POS connection. Try Open drawer. |
| Accented letters or € print wrongly | Set the character set to 858 (or 936 for Chinese). |
| Receipt text is cut off | Check that the paper width (58 / 80 mm) matches the printer. |
| Labels are shifted | In the printer driver, set the paper to the label size and the margins to 0. For label sheets, choose the right sheet type. |
| “OTPOS Retail is already running” | The program only runs once per computer. Check the taskbar or Task Manager. |
| A WebP picture cannot be read | Check that x86\libwebpdecoder.dll and x64\libwebpdecoder.dll are in the program folder. Animated WebP images are not supported. |
| The database cannot be opened | Restore the most recent file from the backups folder (Settings → Backup & data). |
| Forgotten admin password | Ask another admin to reset it in Settings → Staff accounts. |
For help, email [email protected] and, if possible, attach the log file of the current month from the logs folder in the data folder.
19. Glossary
| Term | Meaning |
|---|---|
| Opening float | The cash put in the drawer at the start of a shift, for giving change. |
| Pay in / Pay out | Cash added to or taken from the drawer outside a sale (extra change, supplier payment, cash drop). |
| No sale | Opening the drawer without a sale. |
| X report | A report of the shift so far; the shift stays open. |
| Z report | The end-of-shift report, printed when the shift is closed after counting the drawer. |
| Over / Short | Counted cash is more / less than expected. Balanced when they match. |
| Blind count | Cashiers count the drawer without seeing the expected amount. |
| Held order | A sale parked with Hold to be finished later. |
| Void | Anything removed from a sale before payment; logged for loss prevention. |
| Open-price item | A product with price 0; the price is entered at the till, like a department key on a cash register. |
| Deposit | A refundable amount added for bottles and cans (CRV, Pfand …). |
| Cash rounding | Rounding the cash part of a payment to the smallest coin in use (0.05 in Canada). |
| GST / VAT / Sales tax | Taxes on sales. VAT is usually included in shelf prices; GST and US sales tax are added at checkout. |